Turkey roll ups might seem like a simple, everyday thing, but there’s a quiet magic in their versatility. They’re the kind of dish that feels like a warm hug—familiar, adaptable, and just a little bit nostalgic. I love how you can customize the fillings based on what’s in the fridge or what mood you’re in, making each batch a little different, a little special.
There’s something about rolling up tender slices of turkey around creamy, crunchy fillings that hits the right notes of comfort without feeling heavy. Whether it’s a quick weeknight dinner, a snack for busy kids, or an appetizer at a family gathering, these little bundles always come through. They remind me that sometimes, the simplest ingredients, put together with a bit of care, make the best meals.
Focusing on the nostalgic comfort and versatility of turkey roll ups, this recipe emphasizes making a simple, crowd-pleasing dish that can be customized with various fillings and served in different settings, from quick weeknight dinners to festive gatherings.
The story behind this recipe
- This recipe came from a night when I had a handful of leftovers and a craving for something cozy but quick. I remember the smell of turkey warming up, mixed with the sharp bite of mustard and the crunch of fresh veggies. It’s funny how simple ingredients can come together into something satisfying and unexpected.
- My grandma used to make similar roll-ups, but she’d always add a layer of cream cheese and a dash of dill. That nostalgic flavor stuck with me, and I’ve tweaked it over the years, swapping in different fillings based on what’s in the fridge. Now, it’s become my go-to for a casual snack or a light dinner, especially when I want to keep things uncomplicated but flavorful.
- heading
- story_type
Ingredient breakdown
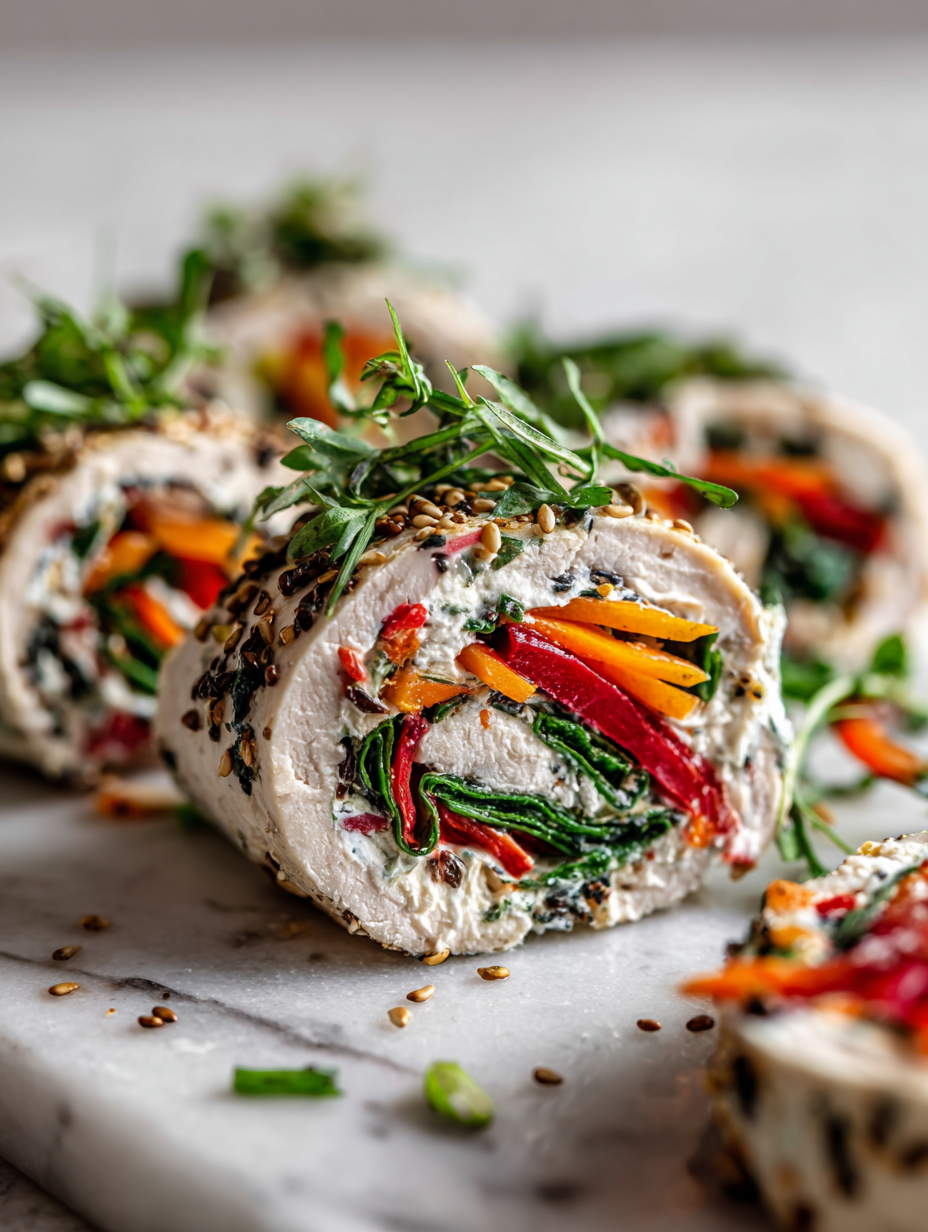
- Turkey slices: I prefer thin, even slices that roll easily, but if yours are thicker, gently pound them to flatten—be careful not to tear. The mild flavor is the perfect blank canvas for any filling.
- Cream cheese: I love how it adds creamy richness, especially when softened at room temp. Swap with Greek yogurt if you want lighter, but the texture will be less lush, and you might need a splash of milk to loosen it up.
- Fresh herbs: Parsley or dill brighten the filling with a fresh, grassy aroma. If you’re out, a pinch of dried herbs works, but they won’t deliver the same vibrant punch.
- Crunchy veggies: Think crisp cucumber or bell peppers—they add a welcome bite. For a softer texture, swap with shredded carrots or even a handful of chopped lettuce, but keep in mind they’ll change the bite.
- Mustard: A dab of Dijon gives a subtle tang that lifts everything. For a sweeter twist, honey mustard works, but cut back on the honey if you want a sharper flavor.
- Wrapping material: Toothpicks help hold everything together if your slices are wide or filling-heavy. If you’re serving these as appetizers, consider lining up with cute picks or edible herbs for presentation.
- Optional cheese: A sprinkle of sharp cheddar or a crumble of feta can add a salty kick—just be cautious with the amount to keep the roll-ups balanced and not overly heavy.
Spotlight on key ingredients
Turkey slices:
- I prefer thin, even slices that roll easily, but if yours are thicker, gently pound them to flatten—be careful not to tear. The mild flavor is the perfect blank canvas for any filling.
- Cream cheese: I love how it adds creamy richness, especially when softened at room temp. Swap with Greek yogurt if you want lighter, but the texture will be less lush, and you might need a splash of milk to loosen it up.
Fresh herbs and crunchy vegetables:
- Fresh herbs: Parsley or dill brighten the filling with a fresh, grassy aroma. If you’re out, a pinch of dried herbs works, but they won’t deliver the same vibrant punch.
- Crunchy veggies: Think crisp cucumber or bell peppers—they add a welcome bite. For a softer texture, swap with shredded carrots or even a handful of chopped lettuce, but keep in mind they’ll change the bite.
Notes for ingredient swaps
- Dairy-Free: Swap cream cheese for mashed avocado or hummus. Expect a different creaminess but keep that rich texture.
- Low-Sodium: Use unsalted turkey slices and add your own salt or seasoning. You’ll control the saltiness better.
- Vegan: Replace turkey with thin slices of zucchini or eggplant, and use cashew-based spread or vegan cream cheese.
- Gluten-Free: Ensure any added fillers or wraps are gluten-free; opt for lettuce or rice paper instead of breaded versions.
- Herb Variations: Fresh basil or cilantro can replace parsley or dill, adding a different aromatic punch and freshness.
- Spicy Kick: Add a dash of hot sauce or sliced jalapeños into the filling for a spicy twist that wakes up the palate.
- Cheese Options: Use feta or shredded mozzarella in place of cheddar for a milder, creamier result. Keep in mind the moisture content.
Equipment & Tools
- Sharp knife: For slicing and pounding turkey to even thickness.
- Baking dish: To bake or assemble the roll-ups in the oven.
- Toothpicks: To secure the roll-ups if they tend to unroll.
- Skillet: For quick searing to add color and texture.
Step-by-step guide to Turkey Roll Ups
- Gather your equipment: a sharp knife, a baking dish, toothpicks, and a skillet for searing if needed.
- Lay out turkey slices flat on a clean surface. If they’re thick, gently pound them to even thickness, about 1/8 inch.
- Prepare your filling: mix cream cheese with herbs, a squeeze of lemon, and a little salt and pepper until smooth.
- Spread a thin layer of the herb cream cheese on each turkey slice, covering about two-thirds of the surface but leaving one edge clear.
- Add your chosen fillings (crisp veggies, cheese shreds, or spreads) along the lined edge of each slice.
- Carefully roll up each turkey slice from the filled edge, pressing gently to seal. Secure with a toothpick if needed.
- Preheat a skillet over medium heat (about 160°C/320°F). Place the roll-ups seam-side down and cook until lightly golden, about 2-3 minutes per side.
- If baking, arrange the roll-ups in a baking dish, drizzle with a little olive oil, and bake at 180°C/356°F for 10-12 minutes until heated through and slightly bubbly.
- Remove from heat, let rest for 2 minutes to settle the filling, then remove toothpicks and arrange on a plate.
- Serve warm or at room temperature, garnished with fresh herbs or a squeeze of lemon for brightness.
Let the roll-ups rest for 2 minutes after cooking to allow the filling to set. Remove toothpicks carefully, then slice and plate. Garnish with fresh herbs or a citrus squeeze for extra zest.
How to Know It’s Done
- The roll-ups are golden and slightly crispy on the outside.
- Filling is hot and gooey when cut into, but not spilling out excessively.
- Turkey slices are firm but tender, with no raw or undercooked edges.
Turkey Roll Ups with Cream Cheese and Veggies
Ingredients
Equipment
Method
- Lay out the turkey slices flat on a clean cutting board or plate. If they are too thick, gently pound them with the bottom of a heavy pan until they are about 1/8 inch thin, being careful not to tear the meat.
- In a small bowl, whisk together the softened cream cheese with chopped herbs and a teaspoon of Dijon mustard until smooth and fragrant. This mixture should be creamy and evenly combined.
- Spread a thin layer of the herbed cream cheese over two-thirds of each turkey slice, leaving one edge clear. Press lightly to help it adhere.
- Place a few chopped cucumber or bell peppers along the edge with the cream cheese, distributing evenly to add crunch and freshness.
- Carefully roll up each turkey slice from the filled edge, pressing gently to seal the filling inside. If the slices are wide or the filling is abundant, secure each roll with a toothpick to prevent unrolling.
- Heat a skillet over medium heat until hot and slightly shimmering. Place the roll-ups seam-side down and cook for about 2-3 minutes, until they develop a light golden color and the outside feels crisp and firm.
- If you prefer baking, arrange the roll-ups in a baking dish, drizzle with a little olive oil, and bake at 180°C (356°F) for 10-12 minutes until heated through and lightly golden.
- Once cooked, remove from heat and let the roll-ups rest for 2 minutes so the filling can set slightly. Carefully remove toothpicks if used.
- Slice each roll-up diagonally if desired and arrange on a serving plate. Garnish with extra herbs or a squeeze of lemon for brightness. Serve warm or at room temperature for a delicious, comforting bite.
Pro tips for perfect Turkey Roll Ups
- Use thin turkey slices for easier rolling and even cooking.
- Warm the cream cheese to room temp for smooth spreading.
- Add herbs and fillings evenly to prevent unbalanced rolls.
- Sear the rolls in a hot pan until golden for added flavor and texture.
- Use toothpicks to secure if your slices are wide or fillings are generous.
- Rest the cooked roll-ups briefly before slicing to let the filling set.
- Keep an eye on the heat; avoid overcooking to prevent drying out.
Common mistakes and how to fix them
- FORGOT to flatten thicker slices → Pound turkey gently to even thickness.
- DUMPED the filling or filling spills out → Use toothpicks or seal edges carefully.
- OVER-TORCHED or burned the roll-ups → Watch heat carefully, cook until golden, not charred.
- UNDERTIMED the baking process → Bake until bubbling and cheese is melty, about 10-12 minutes.
Quick fixes and pantry swaps
- When the filling spills out, use a toothpick to secure the roll-up again.
- If the turkey slices are too thick, gently pound them to even thickness before filling.
- Splash a little water on the pan if the roll-ups start to burn or char quickly.
- Patch a dried-out roll-up by brushing with a bit of broth and reheating gently.
- Shield very thin slices with a quick sear to add color and prevent tearing during rolling.
Prep, store, and reheat tips
- Prepare the filling and assemble the roll-ups up to a day in advance; keep refrigerated to let flavors meld and fillings set, maintaining their freshness and texture.
- Wrap each roll-up tightly in plastic wrap or store in an airtight container. They can be refrigerated for up to 24 hours without losing flavor or moisture.
- For longer storage, freeze the assembled roll-ups for up to 2 months. Wrap well to prevent freezer burn and preserve the delicate flavors.
- Reheating is best done gently: warm in a preheated oven at 180°C/356°F for 10-12 minutes until heated through and filling is gooey. Check for even warmth and avoid over-drying, which can happen if overheated.
- Sensory notes: Expect the flavors to deepen slightly overnight, with fillings tasting more integrated. When reheating, watch for bubbling filling and a golden exterior to signal readiness.
Top questions about Turkey Roll Ups
1. How do I choose the best turkey slices?
Look for turkey slices that are thin and even, so they roll easily without tearing or bulging. If they’re thick, gently pound them flat with a meat mallet or the bottom of a heavy pan.
2. How can I prevent the filling from spilling?
To keep the filling from spilling out, roll the slices tightly, and if needed, secure with toothpicks. Rest the roll-ups for a couple of minutes before slicing so the filling sets.
3. Why are my roll-ups dry or tough?
If the roll-ups turn out dry or tough, try cooking them at a slightly lower heat or for less time. For a juicier result, add a splash of broth or a drizzle of olive oil before baking.
4. How do I slice the roll-ups neatly?
Use a sharp knife to slice cleanly through the roll-ups. For a neater presentation, wipe the blade with a damp cloth between cuts. Serve immediately or reheat gently to avoid drying out.
5. Can I make these ahead of time?
You can prepare the filling and assemble the roll-ups a day ahead. Keep them wrapped tightly in plastic wrap and refrigerate. Reheat in a warm oven or microwave just before serving.
6. Can I make these vegetarian?
For a vegetarian version, replace turkey with thin slices of zucchini, eggplant, or rice paper. Use plant-based spreads or hummus for the filling to keep it creamy and flavorful.
7. My roll-ups unroll during cooking, what do I do?
If you notice the roll-ups are unrolling while cooking, secure them with toothpicks or gently press the seam to seal. Also, avoid overstuffing to prevent bursting.
8. Which herbs work best inside the roll-ups?
Use fresh herbs like parsley or dill to add brightness and aroma. For more vivid flavor, chop and mix them into the filling rather than sprinkling on top.
9. How do I know when they’re done?
When the roll-ups look golden and slightly crispy, smell fragrant, and the filling is hot and gooey, they’re ready. The turkey should feel firm but tender when gently pressed.
10. What’s a good substitute for Dijon mustard?
If you don’t have Dijon mustard, a quick squeeze of lemon juice or a splash of vinegar can brighten the flavor just as well, adding a tangy note.
These turkey roll-ups are a reminder that simple ingredients, handled well, can really shine. They’re perfect for when you want something quick, satisfying, and a little nostalgic without much fuss. Plus, the smell of turkey mingling with herbs and melting cheese is always a welcome scent in my kitchen.
Whenever I make these, I think about how a small, thoughtful touch—like a squeeze of lemon or a sprinkle of fresh herbs—can elevate the whole dish. They’re easy to customize, and that flexibility keeps me coming back. Sometimes, it’s just about enjoying the little moments in cooking, and these roll-ups fit right into that.

Hi, I’m Emma Collins, the recipe developer and writer behind Sailing With Seasons. I’m so happy you’ve found your way here. This blog is my celebration of seasonal ingredients, simple cooking, and the quiet joy that comes from preparing food with intention. Sailing With Seasons is where I share the recipes, lessons, and kitchen rituals that have shaped my life. It is a space built on curiosity, care, and a deep respect for real ingredients.


Leave a Reply