There’s something almost alchemical about browning chicken cubes. The way they transform from dull, pale meat into rich, caramelized bites with a smoky edge is magic that often gets overlooked. I’ve found that giving each piece a good sear unlocks a depth of flavor that you just can’t get from boiling or baking alone.
This recipe is my go-to when I want something hearty but quick, and I love how the caramelization adds a layer of complexity. It’s not about fancy ingredients—just good chicken and a pan that’s hot enough to make those edges sing. It’s honest work, but boy, does it pay off in flavor.
Focusing on the overlooked magic of browning chicken cubes to unlock deep, savory flavor in every bite.
The story behind this recipe
- This recipe grew out of a hectic weeknight where I needed something satisfying fast, but I didn’t want to settle for plain old grilled. I remembered a trip to a small coastal town, where their simple chicken dishes had this incredible smoky, caramelized edge that stayed with me. It struck me how a little browning could turn plain meat into something memorable.
- Over the years, I kept returning to that idea—focusing on browning for flavor, not just for looks. It’s become my secret weapon when I want a dish that feels like it’s got depth, even if the ingredients are simple. It’s about making each piece matter, getting those golden bits that crackle just right, and coaxing out every ounce of savory goodness.
- heading: The story behind this recipe
Ingredient breakdown
- Chicken breast: I prefer skinless, boneless cubes for even cooking and a clean bite. You can swap in thighs for more juiciness, but keep an eye on cook time.
- Salt: I like to season generously—salty enough to enhance flavor without overwhelming. Use sea salt for a cleaner taste, or soy sauce if you want a deeper umami hit.
- Black pepper: Freshly cracked pepper adds a sharp, spicy note that awakens the meat. If you’re out, a pinch of paprika can add warmth and color.
- Oil: I use neutral oil with a high smoke point, like canola or grapeseed, for that initial sear. If you want extra flavor, a splash of sesame oil at the end can be nice.
- Garlic (optional): Minced garlic gives a fragrant punch, but if you’re sensitive, add it later in the cooking process to avoid burning and bitterness.
- Herbs & spices (optional): Dried thyme or oregano can add a subtle earthiness. Fresh herbs go best right at the end for a burst of brightness.
- Lemon juice (optional): Brightens up the dish with a citrusy zing. Skip if you prefer a richer, more savory profile, or add it after cooking for maximum impact.
Spotlight on Key Ingredients
Chicken breast:
- I prefer skinless, boneless cubes for even cooking and a clean bite. You can swap in thighs for more juiciness, but keep an eye on cook time.
- Salt: I like to season generously—salty enough to enhance flavor without overwhelming. Use sea salt for a cleaner taste, or soy sauce if you want a deeper umami hit.
- Black pepper: Freshly cracked pepper adds a sharp, spicy note that awakens the meat. If you’re out, a pinch of paprika can add warmth and color.
Oil and garlic:
- Oil: I use neutral oil with a high smoke point, like canola or grapeseed, for that initial sear. If you want extra flavor, a splash of sesame oil at the end can be nice.
- Garlic (optional): Minced garlic gives a fragrant punch, but if you’re sensitive, add it later in the cooking process to avoid burning and bitterness.
Notes for ingredient swaps
- Chicken breast: I prefer skinless, boneless cubes for even cooking and a clean bite. You can swap in thighs for more juiciness, but keep an eye on cook time.
- Salt: I like to season generously—salty enough to enhance flavor without overwhelming. Use sea salt for a cleaner taste, or soy sauce if you want a deeper umami hit.
- Black pepper: Freshly cracked pepper adds a sharp, spicy note that awakens the meat. If you’re out, a pinch of paprika can add warmth and color.
- Oil: I use neutral oil with a high smoke point, like canola or grapeseed, for that initial sear. If you want extra flavor, a splash of sesame oil at the end can be nice.
- Garlic (optional): Minced garlic gives a fragrant punch, but if you’re sensitive, add it later in the cooking process to avoid burning and bitterness.
- Herbs & spices (optional): Dried thyme or oregano can add a subtle earthiness. Fresh herbs go best right at the end for a burst of brightness.
- Lemon juice (optional): Brightens up the dish with a citrusy zing. Skip if you prefer a richer, more savory profile, or add it after cooking for maximum impact.
Equipment & Tools
- Large skillet or cast iron pan: Ensure even heat and proper searing.
- Spatula or tongs: Flip chicken cubes gently.
- Small bowl: Hold seasoned chicken before cooking.
- Paper towels: Dry chicken to promote browning.
Step-by-step guide to browning chicken cubes
- Equipment & Tools: Use a large, heavy-bottomed skillet—cast iron if you have—to ensure even heat and good searing. Have a spatula or tongs ready for flipping and a small bowl for seasoned chicken.
- Cut chicken into uniform cubes, about 1-inch pieces. Pat dry with paper towels—moisture is the enemy of browning.
- Season chicken generously with salt and pepper. Let sit while you heat the pan.
- Heat your skillet over medium-high heat until it shimmers—about 2-3 minutes. Add a splash of oil, swirl to coat.
- Add chicken cubes in a single layer—don’t overcrowd. Let them sear undisturbed for 2-3 minutes until edges turn golden.
- Flip the cubes, cooking for another 2-3 minutes. You want a deep caramel color on all sides. If sticking, wait a moment—don’t force them.
- Adjust heat if needed to prevent burning. If the pan gets too smoky, lower to medium. Keep an eye on aroma—smoky and savory is good.
- Optional—add minced garlic or herbs in the last minute for fragrance. Cook until fragrant, about 30 seconds.
- Check for doneness—juices run clear when pierced, and chicken is firm but not rubbery. No pink inside.
- Remove chicken from pan, let rest for 2 minutes. Resting helps juices redistribute, keeping cubes tender.
- Serve hot—either straight from the pan or plated with a squeeze of lemon or a sprinkle of herbs for freshness.
Let the chicken rest for 2 minutes off heat to keep it juicy. Serve immediately with a squeeze of lemon or sprinkle of herbs for brightness.
How to Know It’s Done
- Color: Deep golden-brown on all sides with a slight crisp.
- Juices: Clear when pierced, no pink inside.
- Texture: Firm but tender, with a slight crackle on the surface.
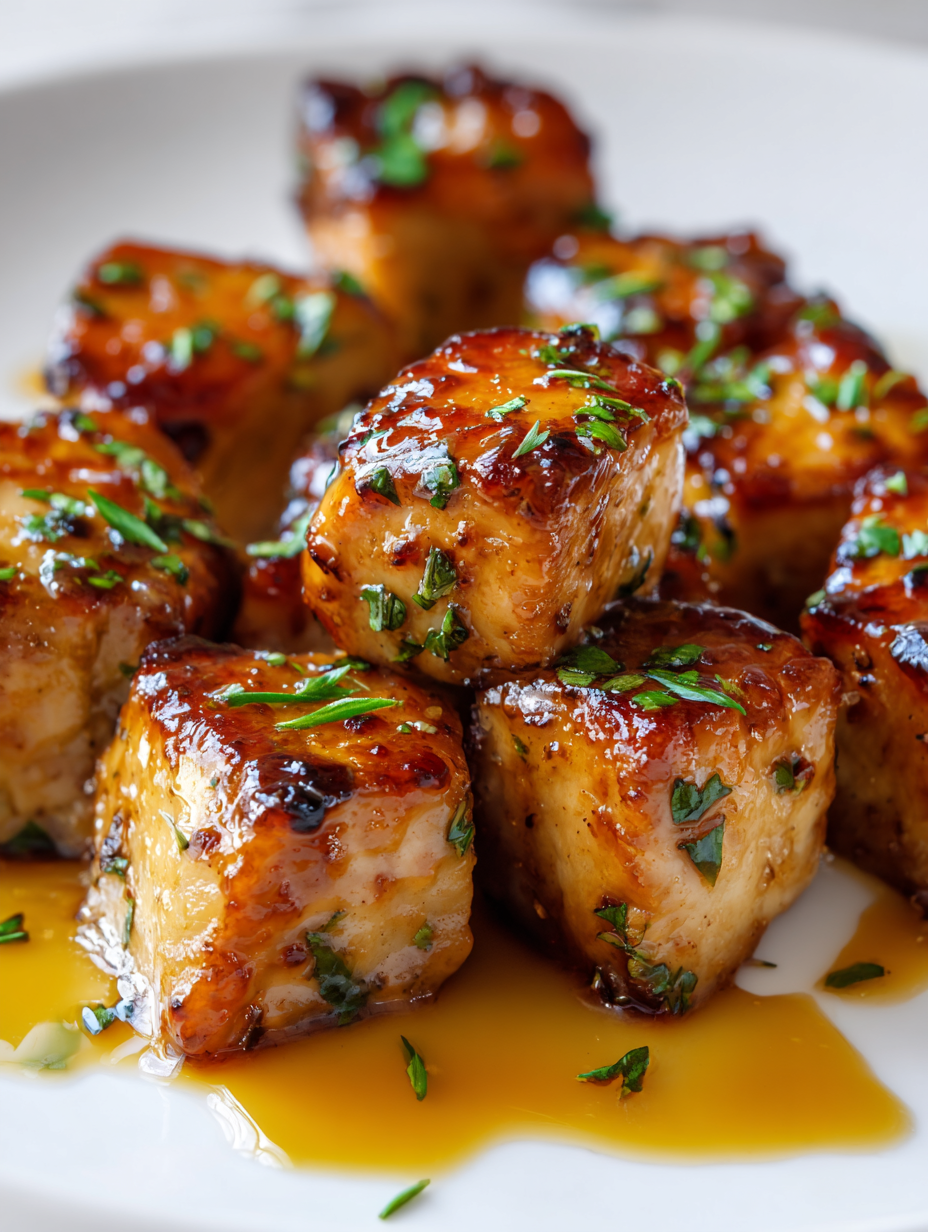
Caramelized Pan-Seared Chicken Cubes
Ingredients
Equipment
Method
- Pat the chicken cubes dry with paper towels to remove excess moisture, which helps achieve better browning.
- Season the chicken generously with salt and black pepper, tossing to coat all pieces evenly. Let sit while you heat your pan.
- Heat your skillet over medium-high heat until it shimmers, indicating it’s hot enough for searing. Add the neutral oil and swirl to coat the surface.
- Add the chicken cubes in a single layer, making sure not to overcrowd the pan—this helps them brown evenly. Let them cook undisturbed for about 2-3 minutes until the edges turn a deep golden brown.
- Flip the chicken cubes using tongs or a spatula, and cook for another 2-3 minutes, until all sides are deeply caramelized and fragrant. You should hear a lively sizzle and see rich, golden-brown edges.
- If using, add the minced garlic and herbs now, cooking for about 30 seconds until fragrant and slightly crispy on the edges. Keep an eye on the aroma and color.
- Check that the chicken is cooked through—juices should run clear, and the meat should feel firm but tender when pierced. Remove the pan from heat.
- Finish by squeezing fresh lemon juice over the chicken for a bright, citrusy note, and give everything a quick toss to coat evenly.
- Transfer the chicken to a plate and let it rest for 2 minutes—this helps the juices settle, keeping each bite juicy and flavorful.
- Serve the caramelized chicken cubes hot, with a side of your choice or over grains, and enjoy the crispy, smoky edges and tender interior.
Notes
Pro tips for perfect chicken cubes
- sear: Ensure your pan is hot enough—look for a shimmering surface before adding chicken to get that perfect crust.
- Quick flip: Use tongs or a spatula to turn cubes gently—avoid overcrowding to prevent steaming and encourage browning.
- Smell as a guide: When the chicken releases a fragrant, nutty aroma, it’s usually ready to turn or remove from heat.
- Crackle test: Listen for a lively crackle when searing—if it quiets down, the surface has browned sufficiently.
- Color check: Aim for deep golden-brown on all sides—this indicates caramelization and rich flavor development.
- Rest period: Let cooked chicken rest for 2 minutes—this redistributes juices and keeps the bites tender.
- Pan temperature: Adjust heat mid-cook—if smoke turns harsh, lower to medium to prevent burning and bitterness.
Common mistakes and how to fix them
- FAILED TO DRY CHICKEN: Pat thoroughly to prevent steaming, fix by increasing heat for better browning.
- DUMPED TOO MUCH OIL: Use moderate amount; too much causes splatter and soggy cubes, reduce for crispness.
- OVER-TORCHED: Burnt edges taste bitter, lower heat if smoke turns harsh, and remove sooner.
- MISSED resting time: Rest for juices to settle, or chicken becomes rubbery and dry.
Quick fixes and pantry swaps
- When chicken sticks, splash a little water and scrape the fond gently to rescue flavor.
- If chicken is overcooked, patch with a quick splash of lemon juice to brighten and moisten.
- Splash some soy sauce onto dull cubes for instant umami and color boost.
- When the pan is too smoky, shield with a lid for 5 seconds to contain fumes and preserve flavor.
- Dumped too much oil? Wipe excess with a paper towel and start with less next time for crispier results.
Prep, store, and reheat tips
- You can prep the chicken cubes up to a day ahead; keep them covered in the fridge to retain freshness and avoid drying out.
- Store cooked chicken in an airtight container in the fridge for up to 3 days. The aroma will deepen, and the texture stays tender if kept properly sealed.
- For longer storage, freeze the chicken cubes in a freezer-safe bag for up to 2 months. They might lose a bit of their initial sear but stay flavorful.
- Reheat gently in a hot skillet or in the oven at 180°C (350°F) until sizzling—look for a slight crackle on the surface and a warm, aromatic smell. Avoid microwaving if you want to preserve that crispy, caramelized edge.
Top questions about Chicken Cubes
1. How do I know when the chicken cubes are properly browned?
Look for a deep golden-brown color on all sides. It should be crisp and fragrant.
2. What’s the best way to check if the chicken is cooked through?
Juices should run clear when pierced, and the meat should feel firm but not rubbery.
3. Is a thermometer necessary for this recipe?
Use a meat thermometer; the internal temperature should reach 75°C (165°F).
4. Why are my chicken cubes sticking to the pan?
If they stick to the pan, give them a moment—don’t force them; let the sear develop.
5. How can I prevent overcrowding in the pan?
Cook in batches if necessary to avoid overcrowding, which causes steaming instead of searing.
6. Should I rest the chicken after cooking?
Rest the cooked chicken for 2 minutes to allow juices to redistribute, keeping them tender.
7. Can I prep the chicken cubes in advance?
Yes, you can prepare the cubes ahead and store them in the fridge for up to 24 hours.
8. What’s the best way to reheat cooked chicken cubes?
Reheat in a hot skillet or oven until sizzling and fragrant, about 5 minutes at 180°C (350°F).
9. How do I fix dry chicken cubes?
Use a splash of water or broth and cover the pan to revive moisture if they dry out.
10. What should I do if my pan gets too smoky?
Adjust heat if the pan smokes excessively; lower to medium to prevent burning and preserve flavor.
Cooking these chicken cubes is about embracing the simple joy of good searing—getting that deep, smoky crust really elevates the dish. It’s a honest, straightforward process that rewards patience and careful attention to heat. Sometimes, the best flavors come from focusing on those small, crispy edges that crackle just right.
In a world full of quick fixes, this recipe reminds me to slow down just enough to let the pan do its magic. It’s perfect for busy nights when you want something flavorful without fuss, and it always makes me appreciate how a little browning can turn plain meat into something memorable.

Hi, I’m Emma Collins, the recipe developer and writer behind Sailing With Seasons. I’m so happy you’ve found your way here. This blog is my celebration of seasonal ingredients, simple cooking, and the quiet joy that comes from preparing food with intention. Sailing With Seasons is where I share the recipes, lessons, and kitchen rituals that have shaped my life. It is a space built on curiosity, care, and a deep respect for real ingredients.

Leave a Reply