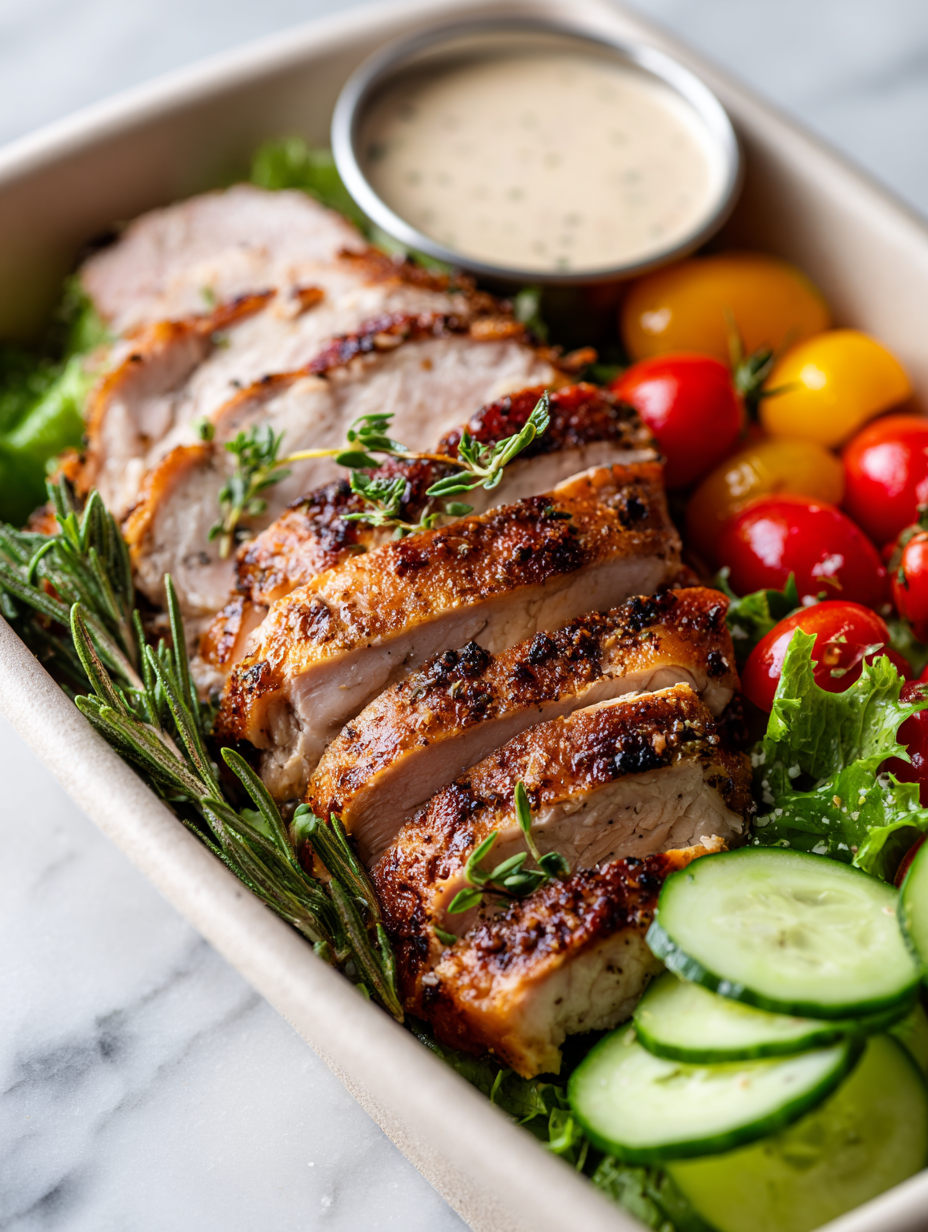
This turkey snack box isn’t just a lunch; it’s a little portable pocket of energy that keeps pace with my busy afternoons. I love how easy it is to pack, especially when I need something satisfying on the go without fussing over hot prep or complicated plating. It’s my go-to for those days when I want flavor and balance without sacrificing time or mess.
What makes this snack box different from your usual packed lunch is the variety—crisp veggies, tender turkey slices, a punchy spread, and some crunchy extras. Each element is chosen to deliver a satisfying crunch, a burst of flavor, and enough protein to keep me from reaching for snacks mid-afternoon. It’s honest, no-nonsense food that feels like a little treat—and it’s a relief to have something so dependable for busy weekdays.
Focusing on how this turkey snack box can serve as a quick, satisfying lunch for busy weekdays, highlighting its portability and balanced flavors that keep you energized through the afternoon.
The story behind this recipe
- I first threw together this turkey snack box after a hectic morning when I realized I forgot to plan lunch. It was a quick scramble to toss together something satisfying that wouldn’t fall apart or require reheating. Turns out, simple was better, and I kept coming back to the idea of combining familiar flavors into one portable package.
- Over time, I’ve tweaked it, adding little touches like extra crunchy veggies or a tangy spread, depending on what I had in the fridge. It’s become my go-to when I need a lunch that’s fast, flexible, and genuinely satisfying. Honestly, it’s more about the little wins—getting a healthy, balanced bite in a hurry—that keeps me coming back.
- heading: The story behind this recipe
Ingredient breakdown: key components
- Turkey slices: I prefer tender, oven-roasted turkey for its juicy bite, but you can swap in leftover roast if that’s what you’ve got. It’s the meat that makes or breaks the snack’s heart—keep it moist and flavorful.
- Cheese: Sharp cheddar adds a punch, but a milder Swiss or creamy havarti can mellow the bite. I like the texture of a good melting cheese, but you can skip it for dairy-free options—just expect a less gooey experience.
- Crunchy veggies: Carrot sticks and cucumber slices give a refreshing snap, and their coolness balances the richness. If you want more bite, add some radishes or bell pepper strips—just keep it crisp and fresh.
- Spread: A smear of hummus or herby Greek yogurt adds moisture and flavor. I love a lemon-bright tzatziki, but a spicy aioli works too—just watch how much you use, so it doesn’t overwhelm.
- Crackers or bread: I go for sturdy whole-grain crackers that won’t sog out too quickly, but a lettuce wrap is a good low-carb alternative. The crunch here is essential—think crispy, not floppy.
- Extras: A handful of nuts or dried cranberries can bring a sweet-salty contrast. I like almonds for crunch, but sunflower seeds are a good budget-friendly swap that still packs a punch.
- Seasoning: A pinch of black pepper or a sprinkle of paprika can lift the flavors. Sometimes I toss in a dash of smoked paprika for a smoky note—just enough to make every bite interesting.
Spotlight on 1–2 key ingredients
Turkey slices:
- I prefer tender, oven-roasted turkey for its juicy bite, but you can swap in leftover roast if that’s what you’ve got. It’s the meat that makes or breaks the snack’s heart—keep it moist and flavorful.
- Cheese: Sharp cheddar adds a punch, but a milder Swiss or creamy havarti can mellow the bite. I like the texture of a good melting cheese, but you can skip it for dairy-free options—just expect a less gooey experience.
Crunchy spread and veggies:
- Crunchy veggies: Carrot sticks and cucumber slices give a refreshing snap, and their coolness balances the richness. If you want more bite, add some radishes or bell pepper strips—just keep it crisp and fresh.
- Spread: A smear of hummus or herby Greek yogurt adds moisture and flavor. I love a lemon-bright tzatziki, but a spicy aioli works too—just watch how much you use, so it doesn’t overwhelm.
Notes for ingredient swaps
- Turkey: I stick with roasted turkey breast for its juicy bite, but leftover roast or even chicken can work. Expect slightly different flavor and moisture levels.
- Cheese: Sharp cheddar adds punch, but Swiss or havarti mellow it out. For dairy-free, skip cheese altogether—just add a little extra spread for moisture.
- Crunchy veggies: Carrots and cucumbers are my go-tos, but radishes or bell peppers bring extra bite and color. Keep them crisp for the best crunch.
- Spread: Hummus is my favorite, especially lemon-bright or spicy varieties. Greek yogurt is a good alternative, but may be less oozy and more tangy.
- Crackers or bread: Whole-grain crackers for crunch, or lettuce wraps if you want low-carb. Just avoid soggy bread—choose sturdy options.
- Extras: Nuts like almonds add crunch, dried cranberries bring sweetness. Sunflower seeds are a budget-friendly swap that still add texture.
- Seasoning: A dash of smoked paprika or black pepper boosts flavor. Keep it light—over-seasoning can overpower the delicate balance.
Equipment & Tools
- Medium bowl: For mixing spreads and prepping veggies
- Sharp knife: For slicing turkey and vegetables
- Cutting board: Provides a stable surface for chopping
- Small mixing spoon: For stirring spreads and assembling
- Airtight container or snack box: For storing and transporting the snack
Step-by-step guide to turkey snack box
- Gather all equipment: a medium-sized bowl, a sharp knife, a cutting board, and a small mixing spoon. The bowl is for prepping veggies and spreading; the knife and board for slicing; the spoon for mixing and spreading.
- First, prep the turkey. If using cold slices, let them sit at room temperature for 10 minutes. If fresh, slice into thin strips about 1/4 inch thick. Keep it tender and easy to bite into.
- Wash and chop your veggies. Carrots into thin sticks, cucumbers into rounds or half-moons. Keep them crisp and bright; they should crackle when bitten.
- In the bowl, mix your spread—hummus, Greek yogurt, or your choice. Add a squeeze of lemon or a dash of hot sauce if you like. Stir until smooth and flavorful.
- Assemble the box: lay a bed of veggies, then layer turkey slices over. Add cheese if using, then spoon some spread on top or on the side. Keep the layers neat but not too tight.
- Pack crunchy extras like nuts or dried cranberries on the side or sprinkled on top for texture and contrast. Keep the box airtight to prevent sogginess.
- Finish with a light sprinkle of seasoning: black pepper, paprika, or herbs. Close the box, label, and store if not eating immediately.
Keep the assembled snack box refrigerated if not eaten immediately. Serve at room temperature for the best flavor and texture, with veggies still crisp and spreads flavorful. Open just before eating to enjoy fresh crunch and aroma.
How to Know It’s Done
- Veggies should be crisp and vibrant, not wilted or soggy.
- Turkey slices should be moist, not dry or rubbery; a slight jiggle indicates juiciness.
- Spread should be smooth, not clumpy, and flavorful enough to complement the ingredients.
Turkey Snack Box
Ingredients
Equipment
Method
- Gather all your equipment and ingredients. Place a medium bowl, sharp knife, and cutting board within easy reach. Have your spreads and extras ready for assembly.
- Slice the turkey into thin strips, about 1/4 inch thick, keeping the meat tender and juicy. Let the slices sit at room temperature for a few minutes to soften slightly.
- Wash and peel the carrot, then cut it into thin sticks or matchsticks. Keep them crisp and vibrant; they should crackle when you bite into them.
- Wash the cucumber and slice it into rounds or half-moons, maintaining their cool, crisp texture. These will add a refreshing crunch to your box.
- In your bowl, stir together the hummus or Greek yogurt until smooth. Add a squeeze of lemon or a dash of hot sauce if you like, mixing briefly to enhance the flavor.
- Lay out your container or snack box and arrange a bed of the crisp vegetables—carrots and cucumbers—on one side. Place the sliced turkey neatly over or beside the veggies, keeping layers tidy but not compressed.
- Dollop or spread the flavorful hummus or Greek yogurt on the side or over the turkey slices, adding moisture and tang. Sprinkle with optional seasonings like black pepper or paprika for extra flavor.
- Add a handful of nuts or dried cranberries on the side or sprinkled over the top for a satisfying crunch and subtle sweetness.
- Seal the container tightly with a lid to keep everything fresh and crunchy. Store in the fridge if not eating immediately, or enjoy right away for the best texture.
Tips and tricks for best results
- Bolded mini-head: Use a hot, dry pan to sear turkey slices quickly—look for a light golden crust within 2 minutes per side.
- Bolded mini-head: Keep veggies crisp—chill sliced cucumbers and carrots in ice water for 10 minutes before packing to maximize crunch.
- Bolded mini-head: Spread at room temperature spreads easily—take them out of the fridge 15 minutes before assembling for a smooth, oozy layer.
- Bolded mini-head: Toast crackers lightly if you want extra flavor and crunch—watch closely to prevent burning, about 1-2 minutes at 180°C (350°F).
- Bolded mini-head: For even slices of turkey, fold the meat and slice against the grain—this keeps it tender and uniform.
- Bolded mini-head: Layer ingredients loosely—pressing down can cause sogginess; leave some space for air circulation, especially with spreads and veggies.
- Bolded mini-head: If the spread is too thick, warm it slightly in the microwave for 10 seconds—makes spreading easier and more even.
Common mistakes and how to fix them
- FORGOT to check the turkey’s moisture? Rest it briefly to retain juiciness.
- DUMPED the seasoning too early? Add salt or spices just before serving for flavor.
- OVER-TORCHED the crackers? Use medium heat and watch closely to prevent burning.
- MISSED the resting time? Let the assembled box sit for 5 minutes to meld flavors.
Quick fixes and pantry swaps
- When the turkey looks dry, splash a little broth or water on it to rehydrate and shimmer.
- If the veggies wilt, patch with an ice bath for 10 minutes to restore crunch and freshness.
- Splash a few drops of lemon juice if spreads turn too thick or dull in flavor.
- Shield soggy crackers by wrapping the box tightly—crispness revives when kept sealed for 5 minutes.
- When in doubt, swap in sunflower seeds or chopped nuts for crunch and quick flavor boost.
Prep, store, and reheat tips
- Prep the turkey slices, veggies, and spreads a day ahead; keep everything crisp and covered in the fridge to preserve freshness and crunch.
- Store assembled snack boxes in an airtight container for up to 24 hours; beyond that, veggies may lose their snap and spreads might get soggy.
- For best flavor, consume within 24 hours. After that, the turkey can start to dry out and spreads may separate or become watery.
- Reheat the turkey slightly in the microwave for 10-15 seconds if you prefer it warmer; veggies and spreads are best served cold or at room temp.
Top questions about Turkey Snack Box
1. How should the turkey be sliced?
Use thinly sliced, tender turkey for the best bite; it should feel juicy and not dry when you bite into it.
2. Can I use leftover turkey?
Yes, leftovers work great. Just slice them thin and keep them moist by covering with a damp cloth before packing.
3. What spreads are best for this box?
A good spread adds moisture and flavor; hummus or herby Greek yogurt work well, adding a smooth, tangy note.
4. How do I keep the veggies crunchy?
Keep the veggies crisp by chilling them before packing; they should crackle when you bite into them.
5. How long does this snack stay fresh?
Store the snack box in the fridge if not eaten immediately. Best eaten within 24 hours for freshness.
6. What’s the best bread or cracker to use?
Use sturdy crackers or lettuce wraps to prevent sogginess; avoid flimsy bread that can get soggy quickly.
7. When should I add seasonings?
Adjust seasonings like black pepper or paprika just before serving to keep the flavors bright and fresh.
8. How do I fix a thick spread?
If the spread feels too thick, warm it slightly for easier spreading and a more inviting texture.
9. How can I enhance flavor in the box?
For a smoky flavor, sprinkle a dash of smoked paprika; for extra zest, add a squeeze of lemon to spreads.
10. What if the turkey dries out?
If the turkey looks dry after storage, splash a little broth or water and cover for a few minutes to rehydrate.
Making this turkey snack box is a small act of rebellion against busy days. It’s honest food, packed with familiar flavors that feel like a quick hug from the fridge. Whenever I need a boost, it’s what I reach for, simple and satisfying.
In the end, it’s not just about the ingredients but the little moments of mindfulness—choosing fresh, balancing textures, and enjoying each bite. That’s what makes this recipe stand out on a hectic weekday. It’s a reminder that good, real food doesn’t have to be complicated.

Hi, I’m Emma Collins, the recipe developer and writer behind Sailing With Seasons. I’m so happy you’ve found your way here. This blog is my celebration of seasonal ingredients, simple cooking, and the quiet joy that comes from preparing food with intention. Sailing With Seasons is where I share the recipes, lessons, and kitchen rituals that have shaped my life. It is a space built on curiosity, care, and a deep respect for real ingredients.


Leave a Reply