Stuffed eggs might seem like a fancy twist on the classic deviled variety, but honestly, they’re just an excuse to play around with flavors and textures. I remember pulling these together after school, mash-up of childhood nostalgia and a bit of kitchen experimentation. The best part? They’re forgiving, adaptable, and can feel special without much fuss.
This recipe started from a messy experiment in my fridge—leftover boiled eggs, some tangy mayo, a dash of mustard, and whatever herbs I had. Somehow, that rough sketch turned into something I’d actually want to serve for brunch or a casual gathering. It’s about turning simple ingredients into a dish that feels like a little celebration, even on a weekday.
Focusing on the nostalgic charm of childhood school lunches, this stuffed eggs recipe transforms simple ingredients into a comforting, savory treat that sparks memories and brings a touch of playful elegance to any table.
The story behind this recipe
- This recipe came from a lazy Sunday afternoon when I found myself with a handful of eggs and a craving for something familiar yet a bit different. I wanted to elevate the humble boiled egg into a small, savory canvas, something that could be both comforting and a little unexpected. The idea of stuffing eggs with a creamy, herbaceous filling felt like a cozy secret I wanted to share.
- Years ago, I hosted a brunch where I threw together a version of these on a whim, and they disappeared faster than I expected. That moment, watching people savor each bite and calling them ‘fancy deviled eggs,’ made me realize how simple ingredients can turn into something memorable. Now, I keep this recipe in my back pocket for when I need a little bit of nostalgia with a twist, especially during spring or holiday gatherings.
- heading: The story behind this recipe
Ingredient breakdown: key components
- Eggs: Fresh, large eggs are my go-to—firm whites, creamy yolks. If yours are a bit old, they might be harder to peel but still work fine.
- Mayonnaise: I like a good, tangy mayo—adds creaminess and helps bind the filling. For a lighter touch, swap in Greek yogurt, but expect a subtler flavor.
- Mustard: A dab of Dijon gives a sharp, bright kick—something I crave in every bite. If you prefer milder, go for yellow mustard, but skip the Dijon for less punch.
- Herbs: Fresh chives or dill brighten the filling with a pop of green and freshness. Dried herbs are okay but won’t deliver the same lively aroma.
- Pickles or Capers: Adds a salty, briny punch that wakes up the flavors and balances the richness. If you skip these, consider a squeeze of lemon for brightness.
- Paprika or Smoked Paprika: A sprinkle on top offers a smoky warmth or just a splash of color. Skip if you’re sensitive to smoky flavors, but don’t forget the visual pop.
- Salt & Pepper: Essential for seasoning—trust your taste buds. Always taste the filling before stuffing to adjust the seasoning, especially if you use store-bought eggs, which can be a bit bland.
Spotlight on key ingredients
Eggs:
- Fresh, large eggs are my go-to—firm whites, creamy yolks. If yours are a bit old, they might be harder to peel but still work fine.
- Mayonnaise: I like a good, tangy mayo—adds creaminess and helps bind the filling. For a lighter touch, swap in Greek yogurt, but expect a subtler flavor.
- Mustard: A dab of Dijon gives a sharp, bright kick—something I crave in every bite. If you prefer milder, go for yellow mustard, but skip the Dijon for less punch.
Herbs & Pickles:
- Herbs: Fresh chives or dill brighten the filling with a pop of green and freshness. Dried herbs are okay but won’t deliver the same lively aroma.
- Pickles or Capers: Adds a salty, briny punch that wakes up the flavors and balances the richness. If you skip these, consider a squeeze of lemon for brightness.
Notes for ingredient swaps
- Eggs: Organic or farm-fresh eggs have richer flavor and better texture, but store-bought work fine for a quick fix.
- Mayonnaise: Use a plant-based mayo or Greek yogurt for a lighter, tangier filling—less creamy, more zing.
- Mustard: Dijon is classic, but yellow mustard is milder; for a smoky twist, try a splash of chipotle sauce.
- Herbs: Fresh parsley or basil add brightness, but dried herbs are okay if you’re short on time—just use less.
- Pickles or Capers: For a milder option, skip or replace with finely chopped cornichons; for extra punch, add a splash of pickle juice.
- Paprika: Regular paprika adds color, but smoked paprika brings a deep, smoky aroma; skip if you dislike smoky flavors.
- Salt & Pepper: Always taste the filling first; adjust with sea salt or freshly cracked pepper for balanced seasoning.
Equipment & Tools
- Saucepan: For boiling the eggs evenly.
- Ice water bowl: Stops cooking and eases peeling.
- Sharp knife: To slice eggs cleanly.
- Mixing bowl: To prepare and mix the yolk filling.
- Piping bag or plastic bag: For neatly filling the egg whites.
- Small spoon: To remove yolks and fill the eggs.
Step-by-step guide to stuffed eggs
- Gather your equipment: a sharp knife, a small spoon, a piping bag or plastic bag with the corner snipped, and a mixing bowl.
- Boil the eggs: Place eggs in a saucepan, cover with water, bring to a boil, then reduce heat and simmer for 9-10 minutes at 100°C (212°F).
- Cool eggs quickly: Transfer eggs to ice water for at least 5 minutes to stop cooking and make peeling easier.
- Peel eggs: Gently tap eggs on a hard surface, peel off shells, and pat dry. Slice eggs in half lengthwise with a sharp knife.
- Remove yolks: Carefully scoop out yolks into the mixing bowl, leaving whites intact. Set whites aside on a plate.
- Prepare filling: Mash yolks with a fork, then fold in mayonnaise, mustard, chopped herbs, salt, and pepper until smooth and creamy.
- Fill the eggs: Transfer the yolk mixture into a piping bag or a plastic bag with the tip cut off, then pipe or spoon into the egg whites evenly.
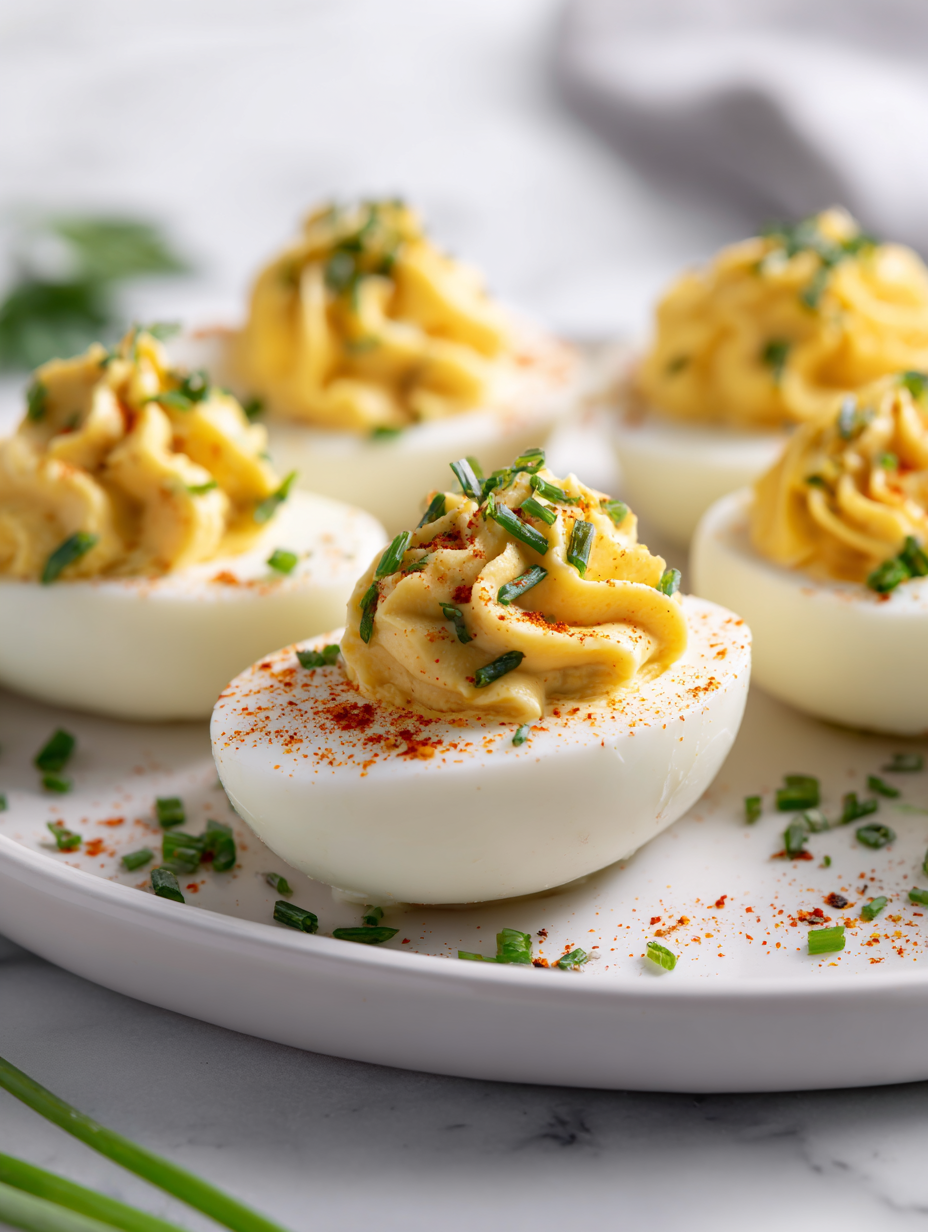
- Garnish: Sprinkle with paprika, chopped herbs, or a tiny dollop of extra mayo for visual appeal.
- Rest and serve: Chill the stuffed eggs in the fridge for at least 15 minutes to let flavors meld. Serve cold, garnished as desired.
Chill the stuffed eggs in the fridge for at least 15 minutes before serving. Garnish just before plating for freshness and visual appeal.
How to Know It’s Done
- Yolks are fully mashed and smooth before filling.
- Egg whites are firm, not soggy or runny.
- Filling is well-seasoned and not overly dry or too runny.
Stuffed Eggs
Ingredients
Equipment
Method
- Place the eggs in a saucepan and cover them with cold water. Bring to a gentle boil over medium heat, then lower the heat and simmer for 9-10 minutes until fully set. Carefully transfer the eggs to an ice water bath and let them chill for at least 5 minutes.
- Gently tap each egg on a hard surface to crack the shell, then peel under cold running water to remove the shell cleanly. Pat the eggs dry and slice each in half lengthwise with a sharp knife.
- Carefully scoop out the bright yellow yolks into a mixing bowl, making sure the whites stay intact. Set the halved whites aside on a serving plate.
- Mash the yolks with a fork until smooth, then fold in the mayonnaise, mustard, chopped herbs, pickles or capers, salt, and pepper. Mix until the filling is creamy and well-seasoned, tasting and adjusting as needed.
- Transfer the yolk mixture into a piping bag fitted with a small round tip or a plastic bag with the corner snipped. Pipe the filling into each egg white half, creating a neat, rounded mound.
- Sprinkle a pinch of paprika over each stuffed egg for color and smoky aroma. Optionally, garnish with extra herbs for a fresh look.
- Chill the stuffed eggs in the refrigerator for at least 15 minutes to let the flavors meld and the filling set. Serve cold and enjoy these nostalgic bites with a modern twist.
Tips & Tricks for Perfect Stuffed Eggs
- Bolded mini-head: Use a piping bag for cleaner, more precise filling—no messy spoon drips.
- Bolded mini-head: Gently tap eggs to crack shells—avoid tearing the whites, for neater presentation.
- Bolded mini-head: Warm the yolk mixture slightly before piping—helps it flow smoothly and fill evenly.
- Bolded mini-head: Sprinkle paprika just before serving—keeps the color vibrant and avoids clumping.
- Bolded mini-head: Chill stuffed eggs uncovered for 10 minutes—sets the filling and reduces moisture on top.
- Bolded mini-head: For extra flavor, fold in a dash of hot sauce or smoked paprika into the filling—adds depth.
- Bolded mini-head: Use fresh herbs for a bright aroma—dried herbs can taste dull and lose their vibrancy.
Common mistakes and how to fix them
- TOO MUCH FILLING: Overstuffed eggs spill out; use a smaller piping tip or spoon carefully.
- UNDERSALTED: Salt the yolk mixture generously; dull flavor if missing before filling.
- OVERCOOKED EGGS: Yolk turns chalky; cook eggs just until yolks are set for best texture.
- PEELING DIFFICULTIES: Old eggs are harder to peel; use fresh eggs for cleaner, easier shells.
Quick fixes and pantry swaps
- If eggs crack during boiling, lower heat and cook gently to prevent shocks.
- Splash cold water on peeled eggs to firm up whites and stop condensation.
- Patch cracked eggs with a little bit of extra yolk to seal small holes—quick fix for presentation.
- When filling spills out, use a damp cloth to tidy the edges before serving.
- Shield delicate fillings with a light layer of additional mayo if they seem too dry or crumbly.
Prep, store, and reheat tips
- You can prep the yolk filling a day ahead and keep it covered in the fridge. It firms up and tastes better after resting.
- Boiled eggs can be peeled and stored in an airtight container in the fridge for up to 24 hours. Keep them covered to prevent drying out.
- Once stuffed, eggs can sit in the fridge for 2-3 hours before serving. The flavors meld nicely, and they stay firm.
- Reheat stuffed eggs gently in the fridge if needed—let sit at room temperature for 10 minutes before serving for the best texture and flavor. Avoid microwaving as it can make the filling rubbery and cause the whites to become soggy.
Top questions about stuffed eggs
1. Can I use really fresh eggs?
Use eggs that are a few days old for easier peeling and better texture, but fresh eggs work fine if handled carefully.
2. How far in advance can I prepare the filling?
Yes, you can make the filling ahead and refrigerate it for up to a day. Just give it a quick stir before filling.
3. How long can I store stuffed eggs?
Keep the stuffed eggs covered in the fridge for up to 2-3 hours. For longer storage, cover tightly and consume within a day.
4. What’s the best way to fill the eggs?
Use a piping bag or a small spoon to fill the egg whites neatly. A piping bag gives a cleaner, more professional look.
5. Why did my eggs crack during boiling?
If the eggs crack during boiling, lower the heat to simmer and cook gently to avoid shocks and cracks.
6. When should I add the paprika topping?
Sprinkle paprika just before serving to keep the vibrant color and avoid clumping or fading.
7. How do I ensure the filling is seasoned right?
Adjust the seasoning by tasting the yolk mash before filling. Add more salt, pepper, or herbs as needed for flavor.
8. Can I add other spices for flavor?
For a smoky flavor, use smoked paprika or add a tiny pinch of chipotle powder to the filling.
9. My filling is too runny or too thick, what now?
If eggs are too runny, add a bit more mayo or mash the yolks longer for a firmer filling. Too thick? Mix in a splash of lemon juice.
10. How do I peel eggs easily?
When peeling eggs, gently tap and roll them on a hard surface, then peel under cold running water for cleaner shells.
These stuffed eggs might bring a nostalgic smile, but they also feel like a little culinary secret. They’re simple enough for a quick weekday snack, yet special enough to serve at brunch or a casual gathering. Honestly, it’s the kind of dish that makes you want to get a little messy in the kitchen.
In the end, it’s about those small moments—smelling the herbs, feeling the creamy filling, watching the bright yolks peek out—that make this recipe worth keeping in your back pocket. No matter the occasion, they remind me that good food doesn’t have to be complicated, just honest and a little playful.

Hi, I’m Emma Collins, the recipe developer and writer behind Sailing With Seasons. I’m so happy you’ve found your way here. This blog is my celebration of seasonal ingredients, simple cooking, and the quiet joy that comes from preparing food with intention. Sailing With Seasons is where I share the recipes, lessons, and kitchen rituals that have shaped my life. It is a space built on curiosity, care, and a deep respect for real ingredients.


Leave a Reply