Baking chicken cutlets might sound simple, but it’s surprisingly forgiving—perfect for those who worry about dry, overcooked chicken. I’ve learned that gentle heat and patience turn these into tender, juicy bites with just a crisp, golden crust. It’s a method that’s easy to master, even on busy weeknights when I want something satisfying without fuss.
There’s something satisfying about the aroma of baking chicken—warm, savory, with a hint of herbs. This recipe is a reminder that good food doesn’t have to be complicated or time-consuming. It’s all about the small details: proper prep, even heat, and letting the chicken rest so the juices stay locked in.
This recipe focuses on how baking chicken cutlets can become a surprisingly forgiving process, perfect for beginners who fear dry chicken. It emphasizes the importance of gentle heat and proper resting, making it accessible and stress-free. The goal is to achieve tender, juicy cutlets with a crisp, golden exterior, even if you’re not a seasoned cook.
The forgiving art of baking chicken
- Baking chicken cutlets feels like a quiet victory—no fuss, just tender, crispy goodness.
- I used to fear dry chicken, but this method’s gentle heat keeps it juicy and forgiving.
- There’s a nostalgic comfort in the simple aroma of baked chicken, reminding me of family dinners from years past.
- Getting this right after a busy day brings a quiet pride—knowing I made something flavorful with minimal stress.
- This recipe changed how I see chicken—less pressure, more trust in the oven’s gentle magic.
The story behind this recipe
- This recipe came together one rainy weekend when I needed something reliable but special. I didn’t want to fuss with frying or breading, just straightforward baked chicken that’s juicy and crisp enough to satisfy. The trick was dialing in the oven temp and giving the cutlets a good rest, so the juices stayed put.
- I remember a dinner with friends where I tossed together these cutlets last minute. The smell of garlic and herbs wafting through the kitchen made everyone slow down, noses in the air. Seeing their happy, surprised faces when they took that first bite reminded me how simple ingredients can make a real impact. It’s become my go-to for busy nights — honest, unpretentious, reliable.
- heading: ‘The story behind this recipe’
Contextual origin, trivia, or history
- This recipe has roots in resourceful home cooking, where baking was a way to avoid frying messes.
- In the early 20th century, baked chicken recipes gained popularity as a healthier alternative to fried dishes.
- The technique of baking thin chicken cutlets spread through European kitchens before becoming a comfort food staple worldwide.
- Using gentle oven heat to cook chicken evenly is a modern twist on traditional stovetop methods, making it more accessible for home cooks.
- This method echoes the simplicity of rustic farm cooking, emphasizing juicy meat and crispy edges without fuss.
Key ingredients and tips
- Chicken breasts: I prefer skinless, boneless breasts—they cook evenly and stay tender. If yours are thicker, gently pound them to an even thickness to avoid uneven cooking.
- Breadcrumbs: I use plain panko for a crunch that’s light yet crisp. For more flavor, toss in some grated Parmesan or a pinch of smoked paprika—adds a smoky, cheesy aroma.
- Herbs and spices: I like a simple mix of garlic powder, paprika, and thyme. Feel free to swap in your favorites—oregano, cumin, or even a dash of curry powder for a twist.
- Olive oil: I drizzle a little over the cutlets before baking—helps them crisp and keeps them juicy. If you’re out, melted butter works too, adding a richer aroma.
- Lemon: A squeeze of fresh lemon brightens everything—look for one with a firm, smooth skin. Skip if you prefer a milder, herbaceous flavor, but it really lifts the dish.
- Salt and pepper: I season liberally—don’t be shy. Proper seasoning is key to flavor, especially since baking can mellow some spices.
- Optional additions: A sprinkle of grated cheese or chopped parsley before baking adds a fresh, cheesy note or a pop of color. Use what you love—it’s flexible.
Spotlight on key ingredients
Chicken breasts:
- I prefer skinless, boneless breasts—they cook evenly and stay tender. If yours are thicker, gently pound them to an even thickness to avoid uneven cooking.
- Breadcrumbs: I use plain panko for a crunch that’s light yet crisp. For more flavor, toss in some grated Parmesan or a pinch of smoked paprika—adds a smoky, cheesy aroma.
Herbs and spices:
- I like a simple mix of garlic powder, paprika, and thyme. Feel free to swap in your favorites—oregano, cumin, or even a dash of curry powder for a twist.
- Olive oil: I drizzle a little over the cutlets before baking—helps them crisp and keeps them juicy. If you’re out, melted butter works too, adding a richer aroma.
Notes for ingredient swaps
- Dairy-Free: Swap bread crumbs for crushed cornflakes or gluten-free panko—still crispy, but with a different texture and flavor.
- Gluten-Free: Use almond meal or gluten-free panko to keep it crunchy without wheat flour. Expect a nuttier aroma.
- Low-Sodium: Choose unsalted breadcrumbs and control salt in your seasoning—your palate will thank you for the balance.
- Herb Variations: Fresh parsley or basil can replace thyme or oregano—adds a bright, fresh herbal note.
- Oil Choices: Swap olive oil for avocado oil or light sesame oil—different smoky or nutty undertones, but equally good for baking.
- Lemon Alternatives: Lime or vinegar-based marinades can substitute lemon—provides acidity without the citrus burst.
- Spice Level: Add a pinch of cayenne or paprika for heat—just a little kick that elevates the flavor without overpowering.
Equipment & Tools
- Baking sheet: To hold the chicken during baking.
- Parchment paper or silicone mat: For easy cleanup and prevent sticking.
- Shallow dishes: For breading station—egg wash and breadcrumbs.
- Tongs or fork: To handle chicken without tearing the coating.
- Meat thermometer: To check internal temperature for safety.
Guide to Perfect Baked Chicken Cutlets
- Preheat your oven to 200°C (390°F). Line a baking sheet with parchment paper or a silicone mat for easy cleanup.
- Prepare the equipment: use a shallow dish for the breadcrumbs, a small bowl for the egg wash, and tongs or a fork for handling the chicken.
- Pound the chicken breasts to an even thickness, about 1/2 inch (1.3 cm). This ensures uniform cooking and prevents dry edges.
- Season the chicken with salt, pepper, and any preferred spices on both sides. Set aside.
- Set up your breading station: dip each cutlet in the beaten egg, letting excess drip off, then coat thoroughly in breadcrumbs. Press lightly to adhere.
- Place the breaded cutlets on the prepared baking sheet. Drizzle or spray lightly with olive oil to promote browning.
- Bake in the preheated oven for 15–20 minutes. Flip halfway through, and bake until the crust is golden and the chicken reaches an internal temperature of 74°C (165°F).
- Check for doneness: the crust should be crisp, and the chicken should be firm but tender when pressed gently. The edges will be golden brown.
- Remove from oven, and let rest for 5 minutes. This helps juices redistribute and keeps the meat moist.
- Serve hot with your favorite sides, garnished with fresh herbs or a squeeze of lemon for brightness.
Let the chicken rest for 5 minutes on a plate, uncovered. Then, serve with a squeeze of lemon or fresh herbs. Pair with simple greens or roasted veggies for balance.
How to Know It’s Done
- Crust is golden and crispy.
- Internal temperature reaches 74°C (165°F).
- Juices run clear when pierced.
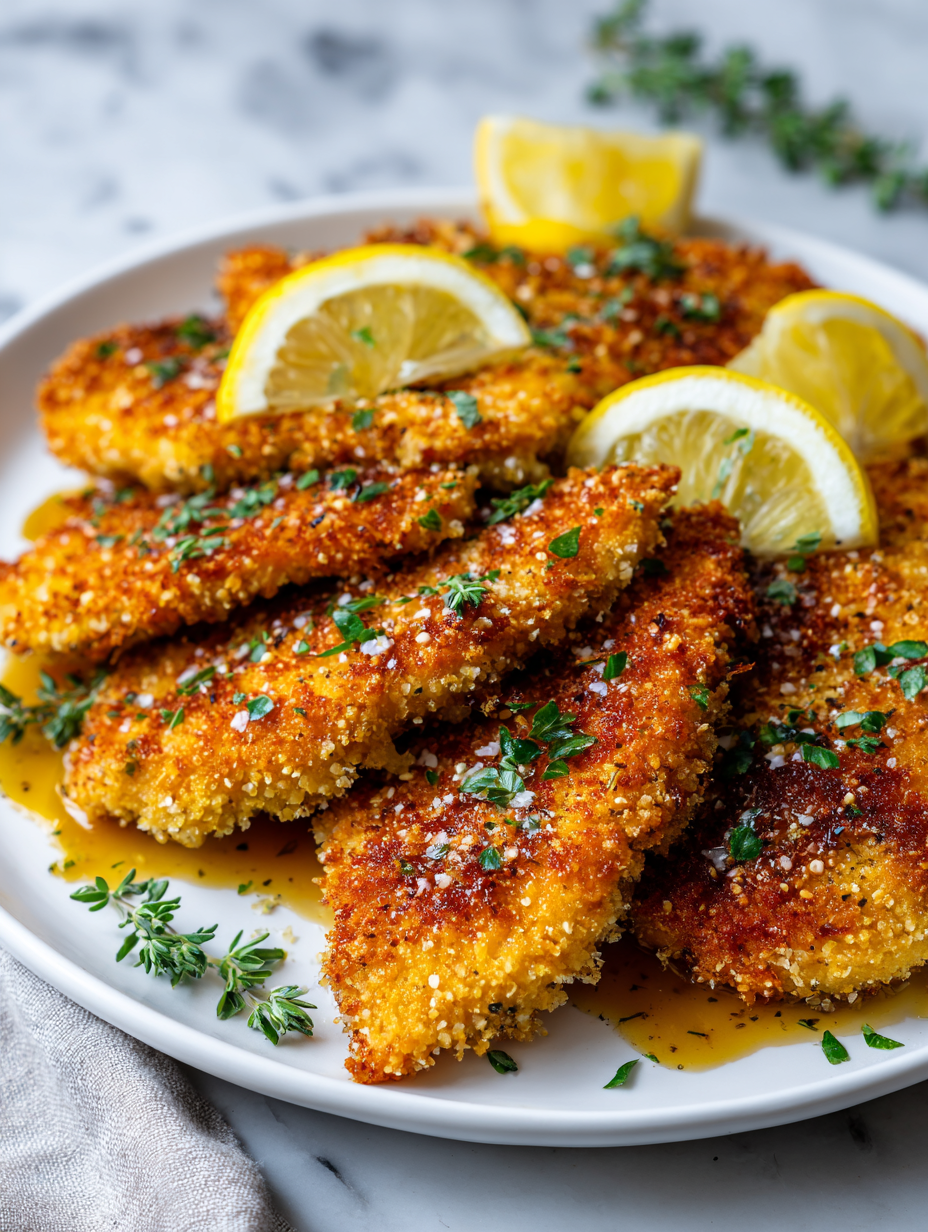
Baked Chicken Cutlets
Ingredients
Equipment
Method
- Preheat your oven to 200°C (390°F). Line a baking sheet with parchment paper or a silicone mat for easy cleanup.
- Pound the chicken breasts to an even thickness of about 1/2 inch, ensuring they cook uniformly. Season both sides generously with salt, pepper, garlic powder, paprika, and thyme.
- Set up your breading station: place beaten eggs in one shallow dish and mix the panko with Parmesan, if using, and additional seasonings in another.
- Dip each chicken cutlet into the beaten eggs, allowing excess to drip off, then coat thoroughly in the seasoned breadcrumbs, pressing lightly to adhere.
- Arrange the breaded cutlets on the prepared baking sheet, spacing them evenly. Drizzle or spray lightly with olive oil for a golden, crispy crust.
- Bake in the preheated oven for 15–20 minutes, flipping halfway through, until the crust is golden brown and the internal temperature reaches 74°C (165°F).
- Once baked, remove the chicken from the oven and let rest for 5 minutes. This helps the juices redistribute, keeping the meat moist.
- Squeeze fresh lemon over the cutlets just before serving for a bright, fresh flavor. Serve hot alongside your favorite sides.
Pro tips for perfect baked chicken cutlets
- Bolded mini-head: Use a gentle press when breading to help crumbs adhere better and create an even crust.
- Bolded mini-head: Drizzle oil evenly over the cutlets before baking—this promotes a uniformly crispy exterior.
- Bolded mini-head: Pounding the chicken to an even thickness ensures consistent cooking and juicy results.
- Bolded mini-head: Bake at a slightly higher heat for the first 10 minutes, then lower to finish, for a crisp but tender crust.
- Bolded mini-head: Rest the chicken for at least 5 minutes after baking—this locks in the juices and keeps it moist.
- Bolded mini-head: Flip the cutlets halfway through baking to promote even browning on both sides.
- Bolded mini-head: Use a meat thermometer to check for 74°C (165°F) internally—avoid guesswork and dry meat.
Common mistakes and how to fix them
- FORGOT to preheat oven → Always preheat for even cooking and crisp crust.
- DUMPED breading → Shake off excess to avoid burnt spots and uneven coating.
- OVER-TORCHED edges → Reduce oven temp or cover loosely to prevent burning.
- MISSED resting time → Rest chicken 5 minutes to retain juices and stay tender.
Quick Fixes and Pantry Swaps
- When chicken releases liquid during baking, splash with a little olive oil to revive crispness.
- If breadcrumbs aren’t sticking well, pat chicken dry and add a light spray of oil before coating.
- Dumped breadcrumbs? Patch with a quick sprinkle of seasoned panko for extra crunch and flavor.
- Over-torched edges? Shield with foil for the last few minutes to prevent burning while finishing cooking.
- When in doubt, rescue with a quick 5-second blast under the broiler—watch for golden perfection.
Prep, store, and reheat tips
- Prep the chicken cutlets by pounding and seasoning them a few hours in advance; keep covered in the fridge. The flavors meld and the surface stays firm for crisp coating.
- Breadcrumb coating can be prepared ahead and stored in an airtight container for up to 2 days. Keep away from moisture to maintain crunchiness.
- Cooked chicken cutlets can be refrigerated for up to 3 days. Reheat in a hot oven (around 180°C/350°F) until warmed through and crispy, about 10 minutes, smelling warm and toasty.
- For freezer storage, flash freeze the breaded cutlets on a tray, then transfer to a zip-top bag. They can last 1–2 months. Bake directly from frozen, adding a few extra minutes.
- Reheating will soften the crust slightly; a quick blast under the broiler or in a hot oven helps restore crispness and aroma of baked chicken.
Top questions about baked chicken cutlets
1. How do I keep chicken cutlets juicy when baking?
Use thin, even chicken breast slices to avoid dry edges. Pounding them to uniform thickness helps cook evenly and stay juicy.
2. Can I customize the breading for different flavors?
Bread crumbs can be seasoned with herbs, garlic powder, or Parmesan. Swap panko for crushed cornflakes for extra crunch.
3. What’s the ideal oven temperature and baking time?
Preheat your oven to 200°C (390°F). Bake for about 15-20 minutes until golden and the internal temp hits 74°C (165°F).
4. Why should I rest the chicken after baking?
Let the cutlets rest for 5 minutes after baking to lock in juices. Use tongs or a spatula for easy handling.
5. How do I know when the chicken is cooked through?
Use a meat thermometer to check internal temperature. The chicken should be firm, no pink, and juices clear.
6. Can I make this gluten-free?
For gluten-free, substitute panko with crushed nuts or gluten-free bread crumbs. Expect a slightly different texture but still crispy.
7. What are good oil substitutes?
Replace olive oil with avocado oil or light sesame oil for different smoky or nutty flavors.
8. How do I enhance the flavor after baking?
Add a squeeze of lemon or herbs before serving to brighten flavors and add freshness.
9. What if the coating doesn’t stick properly?
If breadcrumbs aren’t sticking, pat chicken dry and add a light spritz of oil before breading.
10. How should I reheat leftovers for best texture?
Reheat in a hot oven or under the broiler for 10 minutes until crispy. Avoid microwaves which can make it soggy.
This baked chicken cutlets recipe isn’t just about the ease—it’s about the comforting aroma and satisfying texture that make weeknights feel a little more special. The smell of garlic and herbs filling the kitchen, the crunch of golden breadcrumbs, those tender bites—this dish captures a moment of honest, simple cooking.
Sometimes, it’s the straightforward recipes that remind us why we cook—trusting the oven, resting the meat, and letting good ingredients do their quiet magic. It’s a reminder that even in a busy world, a well-made, honest meal can bring a sense of calm and accomplishment.

Hi, I’m Emma Collins, the recipe developer and writer behind Sailing With Seasons. I’m so happy you’ve found your way here. This blog is my celebration of seasonal ingredients, simple cooking, and the quiet joy that comes from preparing food with intention. Sailing With Seasons is where I share the recipes, lessons, and kitchen rituals that have shaped my life. It is a space built on curiosity, care, and a deep respect for real ingredients.
Leave a Reply