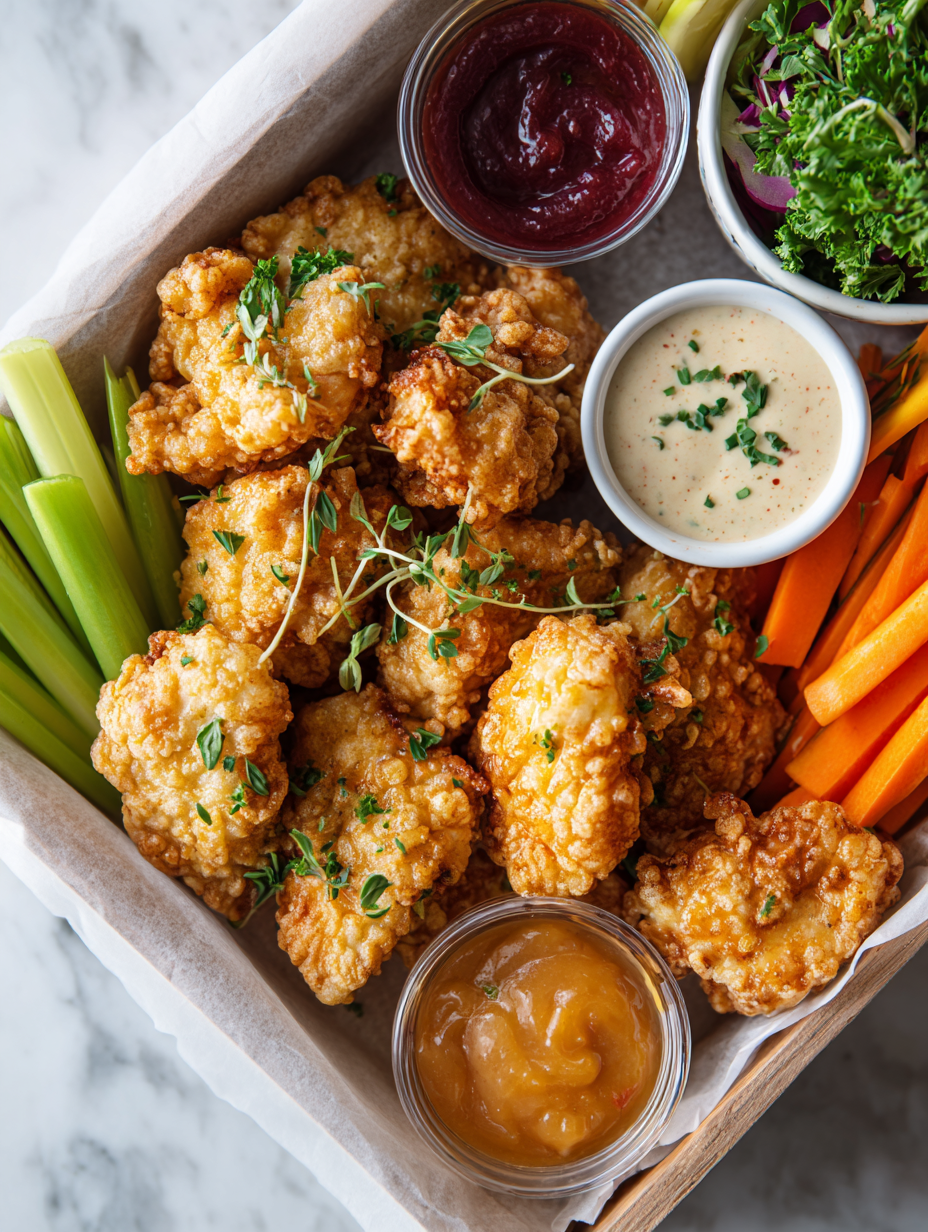
This Chicken Snack Box is my answer to busy weekdays when I need something quick, satisfying, but still feels like I made a little effort. It’s about assembling a variety of bites that are portable and customizable, so everyone gets a little of what they love. Plus, it’s pretty forgiving—swap ingredients, add extras, make it your own.
What I really like about this is how it turns a simple chicken breast into the centerpiece of a meal that feels fun and personal. I can prep most of it ahead, stash it in the fridge, and then just assemble when hunger hits. No fuss, no stress, just a tray of colorful, flavorful bits ready to grab and go.
Focusing on how this Chicken Snack Box can serve as a customizable, portable lunch for busy weekdays, emphasizing how assembling it feels like creating a personal snack palette that’s both satisfying and easy to grab on the go.
The story behind this recipe
- This recipe came together on a lazy Sunday afternoon, when I realized I wanted something more personal than just store-bought snacks. I had some leftover grilled chicken and a handful of colorful veggies, and suddenly, assembling a snack box felt like creating a tiny, edible palette. It’s a mix of nostalgia for childhood lunchboxes and the satisfaction of making something myself, even if it’s just for an afternoon break.
- In those moments, I remember how simple, honest food can turn a mundane day around. There’s a quiet joy in picking out your favorite bites—crispy, tender, spicy, bright—and knowing you built it yourself. It’s not fancy, but it’s real, and it’s mine.
- heading: The story behind this recipe
Ingredient breakdown: key components
- Chicken breast: I prefer a tender, juicy cut—marinate with a splash of lemon and a pinch of salt. You can swap with turkey if you want leaner protein, but keep in mind it might need slightly less cooking time.
- Assorted veggies: Crisp bell peppers, crunchy carrots, and snap peas add freshness and color. If you’re short on time, use pre-cut or pickled veggies for a tangy punch, or skip them for a more streamlined box.
- Dips and spreads: A dollop of hummus or spicy mayo brightens the bites. I love smoky paprika mayo—smoky and creamy, but if you prefer dairy-free, try a tahini drizzle instead.
- Crackers and bread: I like sturdy crackers that hold up to toppings—think whole grain or multigrain. For a softer option, sliced baguette works, but toast it lightly to avoid sogginess.
- Fruits: Bright, juicy grapes or crisp apple slices add a sweet contrast. If you want a more tart note, go for some dried apricots or cranberries; fresh fruit keeps it lively.
- Nuts and seeds: Toasted almonds or sunflower seeds add crunch. If nut allergies are a concern, pumpkin seeds are a good swap, and they add a toasty, slightly earthy flavor.
- Herbs and seasonings: Fresh parsley, cilantro, or basil make the flavors pop. If you’re out, a sprinkle of dried herbs works, but fresh herbs really lift the entire bite.
Spotlight on key ingredients
Chicken breast:
- I prefer a tender, juicy cut—marinate with a splash of lemon and a pinch of salt. You can swap with turkey if you want leaner protein, but keep in mind it might need slightly less cooking time.
- Assorted veggies: Crisp bell peppers, crunchy carrots, and snap peas add freshness and color. If you’re short on time, use pre-cut or pickled veggies for a tangy punch, or skip them for a more streamlined box.
Veggies & Fruits:
- Assorted veggies: Bright, crunchy, and vibrant—these add a fresh bite and a pop of color. During cooking, they stay crisp if not overdone and enhance the overall crunch.
- Fruits: Juicy grapes or crisp apple slices bring a sweet, refreshing contrast. They hold up well if added just before serving, but can turn mushy if left too long.
Notes for ingredient swaps
- Dairy-Free: Swap dairy-based dips like ranch for hummus or spicy bean dips—both add flavor without the dairy richness.
- Gluten-Free: Use rice crackers or seed crackers instead of wheat-based ones—crunchy and sturdy, but without gluten.
- Vegetarian: Replace chicken with firm tofu or tempeh—marinate for extra flavor and pan-fry until golden and crispy.
- Spicy: Add a dash of hot sauce or cayenne to dips for extra heat—adjust to your spice tolerance, but keep it lively.
- Sweet: Incorporate dried fruit like cranberries or apricots—brighten the box with a chewy, tangy contrast, but keep portion controlled.
- Nut-Free: Use toasted pumpkin seeds or sunflower seeds instead of nuts—crunchy and earthy, safe for nut allergies.
- Herb Variations: Switch parsley for cilantro or basil—fresh herbs brighten the flavors, but choose what you love or have on hand.
Equipment & Tools
- Medium bowl: To season and toss chicken pieces.
- Baking sheet: To bake chicken for a crispy finish.
- Sharp knife: To cut chicken and vegetables precisely.
- Cutting board: To prepare ingredients safely.
- Small bowl for sauces: To serve dips and spreads.
- Meat thermometer: To check chicken doneness accurately.
Step-by-step guide to Chicken Snack Box
- Gather all equipment: a medium-sized bowl, a baking sheet, a sharp knife, a cutting board, a small bowl for sauces, and a meat thermometer. Preheat oven to 200°C (390°F).
- Slice chicken breast into bite-sized pieces, about 2 cm (¾ inch). Season with salt, pepper, and a splash of olive oil. Toss well to coat evenly.
- Heat a large skillet over medium-high heat. Add a tablespoon of oil. When shimmering, add chicken pieces. Cook for 5-7 minutes, stirring occasionally, until golden and cooked through. Internal temp should reach 75°C (165°F).
- While chicken cooks, prepare vegetables: slice peppers, julienne carrots, and trim snap peas. Keep ready for assembly.
- Transfer cooked chicken to a baking sheet lined with parchment paper. Bake in preheated oven for 8-10 minutes, or until slightly crispy around edges. Check for a juicy interior and a slight caramelization.
- In the meantime, arrange vegetables on a small platter or in small cups. Prepare dips—spicy mayo, hummus, or your choice—and set aside.
- Once chicken is baked, let it rest for 5 minutes. This keeps it juicy and easy to handle. Then, assemble your snack box: layer chicken, vegetables, dips, crackers, and fruits in a portable container.
- Finish with fresh herbs sprinkled on top for brightness. Serve immediately or pack for an on-the-go lunch. Keep cold if not eating right away.
Let the cooked chicken rest for 5 minutes to retain juices. Assemble the snack box with colorful, fresh ingredients. Finish with a sprinkle of herbs, then serve or pack for later.
How to Know It’s Done
- Chicken reaches 75°C (165°F) with a probe thermometer for safe, juicy meat.
- Chicken pieces are golden and slightly caramelized around edges for flavor and texture.
- Vegetables are crisp and brightly colored, not wilted or soggy.
Chicken Snack Box
Ingredients
Equipment
Method
- Preheat your oven to 200°C (390°F). Gather all your equipment and ingredients. Slice the chicken breasts into bite-sized pieces and place them in a medium bowl.2 pieces chicken breasts
- Drizzle the chicken with olive oil, then sprinkle with salt and black pepper. Toss everything together until the chicken is evenly coated with seasonings.1 tablespoon olive oil, 1 pinch salt, 1 pinch black pepper
- Spread the seasoned chicken evenly on a baking sheet lined with parchment paper. Bake in the preheated oven for 8-10 minutes, or until the chicken is cooked through and slightly caramelized around the edges. Use a meat thermometer to ensure it reaches 75°C (165°F).2 pieces chicken breasts
- While the chicken bakes, prepare the vegetables: slice the bell peppers, julienne the carrots, and trim the snap peas. Arrange these on a serving platter or in small cups for easy access.1 cup bell peppers, 1 cup carrots, 1/2 cup snap peas
- Once the chicken is cooked, remove it from the oven and let it rest for 5 minutes. Meanwhile, halve the grapes and slice the apple thinly for a crisp, juicy addition.2 pieces chicken breasts, 1 cup grapes, 1 apple crisp apple
- Arrange the cooked chicken in a section of your container or plate. Add the fresh vegetables, fruits, and sprinkle toasted almonds or sunflower seeds over the top for crunch. Place dips in small bowls or on the side.2 pieces chicken breasts, 1 cup bell peppers, 1 cup carrots, 1/2 cup snap peas, 1 cup grapes, 1 apple crisp apple, 1/4 cup toasted almonds, 4 tablespoons hummus or spicy mayo
- Finish by sprinkling chopped fresh herbs over the entire assembly for a burst of aroma and flavor. Serve immediately or pack for a portable lunch. Keep cold if not eating right away.2 tablespoons fresh herbs
Pro tips for perfect snack assembly
- Bolded mini-head: Use a hot pan → Ensures a crisp, golden exterior on chicken pieces.
- Bolded mini-head: Keep veggies crunchy → Sauté briefly over high heat for bright, fresh texture.
- Bolded mini-head: Don’t overcrowd the pan → Cook in batches to avoid steaming and sogginess.
- Bolded mini-head: Rest chicken before slicing → Juices redistribute, keeping meat tender and moist.
- Bolded mini-head: Add herbs at the end → Keeps their bright aroma and flavor lively, not muted.
- Bolded mini-head: Use a probe thermometer → Guarantees perfectly cooked, juicy chicken every time.
- Bolded mini-head: Assemble just before eating → Keeps textures crisp and dips fresh for maximum flavor.
Common mistakes and how to fix them
- FORGOT to check chicken temperature → Use a probe thermometer for juicy, safe meat.
- DUMPED sauce into chicken → Keep sauces separate until assembly to prevent sogginess.
- OVER-TORCHED veggies → Sauté until crisp-tender, not browned or burnt for fresh flavor.
- MISSED resting time → Let chicken rest 5 minutes before slicing or packing for juiciness.
Quick fixes and pantry swaps
- If chicken is undercooked, splash it with a little lemon juice to brighten flavor while finishing cooking.
- When sauce is too thick, patch with a splash of warm water or broth until it shimmers smoothly.
- DUMPED too much salt? Splash in a little vinegar or honey to balance out the saltiness.
- Over-torched veggies? Shield with a lid and lower heat, then stir gently to prevent burning.
- When spice levels are off, rescue with a dollop of yogurt or cool ranch to tame the heat.
Prep, store, and reheat tips
- Prep cooked chicken in advance; store in an airtight container for up to 3 days. The aroma of seasoned, tender meat will remind you of Sunday roast leftovers.
- Cut vegetables and fruits ahead of time; keep separate in sealed containers for 1-2 days. Freshness wanes slightly, but vibrant crunch remains if kept cold.
- Assemble the snack box just before eating; if making ahead, keep components separate and layer just before serving to preserve textures.
- Reheat chicken gently in a warm oven at 150°C (300°F) for 10 minutes, or microwave in short bursts, until warmed through and fragrant. Watch for steam and avoid drying out.
- Dips and spreads can be made a day ahead; refrigerate and stir before serving. Expect flavors to deepen slightly overnight, adding richness.
- For longer storage, freeze cooked chicken for up to 2 months; thaw overnight in fridge, then reheat with a hint of steam and scent of seasoned meat.
Top questions about Chicken Snack Box
1. Can I use pre-cooked chicken?
Use cooked, shredded chicken for quick assembly or grilled chicken breasts sliced thin for juiciness and flavor.
2. Is cooked leftover chicken okay to use?
Yes, but fresh cooked chicken tastes better and stays moist longer in the box.
3. How long does it last in the fridge?
Store components separately in airtight containers for up to 3 days, then assemble fresh.
4. Can I reheat the chicken?
Reheat chicken gently in a warm oven or microwave until steaming hot, about 1-2 minutes.
5. Can I customize the ingredients?
Yes, you can swap out veggies like bell peppers for cucumbers or cherry tomatoes for more crunch.
6. What’s the best bread or crackers to use?
Use sturdy crackers or sliced baguette; toast lightly to prevent sogginess during transport.
7. How do I keep it fresh and flavorful?
Add a splash of lemon juice or sprinkle fresh herbs to brighten flavors before serving.
8. Should dips be added in advance?
Keep dips separate until ready to eat to prevent sogginess and maintain fresh taste.
9. How do I pack it for portability?
Yes, but avoid overstuffing to keep everything neat and prevent ingredients from mixing too much.
10. What’s a good container for this snack box?
Use colorful, compartmentalized containers for easy access and visual appeal on the go.
This Chicken Snack Box isn’t just about convenience; it’s about creating a little moment of joy in a busy day. When you open it up and see all those vibrant colors and familiar flavors, it feels like a small celebration. It’s honest, simple food that helps me keep things balanced and satisfying.
In the end, it’s about those quick, meaningful bites that remind you food can be both easy and nourishing. No fuss, just real ingredients, assembled with care—ready whenever hunger strikes or the craving for something fresh hits.

Hi, I’m Emma Collins, the recipe developer and writer behind Sailing With Seasons. I’m so happy you’ve found your way here. This blog is my celebration of seasonal ingredients, simple cooking, and the quiet joy that comes from preparing food with intention. Sailing With Seasons is where I share the recipes, lessons, and kitchen rituals that have shaped my life. It is a space built on curiosity, care, and a deep respect for real ingredients.
Leave a Reply