Getting that perfect crispy exterior on paneer cubes is a little dance in the kitchen. It’s about balancing heat, timing, and a good non-stick pan—nothing fancy, just what you need to get it right. I’ve burnt more than a few batches before I nailed that golden, crackly shell without turning the inside into rubber.
This recipe isn’t just about frying; it’s about respecting that soft, melting core of the paneer. Sometimes, I rush and the outside burns before the inside warms up properly. Learning to control the heat and give each cube enough space makes all the difference. It’s a small win that turns into a Sunday staple for me, especially when I want something quick but satisfying.
Focusing on how to achieve the perfect crispy exterior on paneer cubes without losing that soft, melting interior, tackling common pitfalls like sticking or overcooking.
The story behind this recipe
This recipe started from a lazy weekend craving something crispy and comforting but with a twist of nostalgia. I remembered those times as a kid, helping my grandma fry up paneer for special occasions, the smell of spices filling the air. Over time, I learned that the secret isn’t just in frying but in getting that perfect balance between a crackly exterior and a tender inside, which took a few burnt batches to master. Now, it’s become my go-to snack when I want something quick and satisfying, especially when I’m craving a bit of home in every bite.
Ingredient breakdown: key components
- Paneer: I prefer homemade or fresh store-bought for that squeaky, milky flavor. If it feels too firm, soak it briefly in warm water before cubing; it softens beautifully.
- Cooking Oil: I use neutral oil like vegetable or canola, which has a high smoke point and keeps the paneer crispy without imparting extra flavor. If you want extra crunch, go for peanut oil.
- Cornstarch or Rice Flour: I toss the cubes in a light coating; it creates that irresistible crackle. If you want a slightly lighter crunch, reduce the amount but don’t skip this step.
- Spices & Salt: I keep it simple—just a pinch of turmeric and chili powder for color and heat. Adjust salt carefully—paneer absorbs salt quickly, so taste your marinade or coating first.
- Optional Add-ins: Fresh herbs or chili flakes—these add a pop of brightness or heat. I like a squeeze of lemon after frying for that zesty contrast, especially if the paneer feels a bit bland.
- Marinade or Seasoning: I sometimes marinate cubes in a mix of yogurt and spices for an extra layer of flavor, but for crispy frying, plain seasoned cubes work just fine. Think of it as a blank canvas with potential.
Spotlight on key ingredients
Paneer:
- I prefer homemade or fresh store-bought for that squeaky, milky flavor. If it feels too firm, soak it briefly in warm water before cubing; it softens beautifully.
- Cooking Oil: I use neutral oil like vegetable or canola, which has a high smoke point and keeps the paneer crispy without imparting extra flavor. If you want extra crunch, go for peanut oil.
Coating ingredients:
- Cornstarch or Rice Flour: I toss the cubes in a light coating; it creates that irresistible crackle. If you want a slightly lighter crunch, reduce the amount but don’t skip this step.
- Spices & Salt: I keep it simple—just a pinch of turmeric and chili powder for color and heat. Adjust salt carefully—paneer absorbs salt quickly, so taste your marinade or coating first.
Notes for ingredient swaps
- Dairy-Free: Use firm tofu instead of paneer. It absorbs flavors well, but won’t have that milky richness.
- Oil: Swap vegetable oil for coconut or avocado oil for a subtly different flavor and higher smoke point.
- Gluten-Free: Replace cornstarch with rice flour or chickpea flour for a lighter, gluten-free crunch.
- Flavor Boost: Add a dash of smoked paprika or cumin powder to the coating for extra smoky depth.
- Herb Variations: Incorporate fresh chopped cilantro or mint into the coating for a burst of freshness.
- Lemon Brightness: Squeeze fresh lemon juice after frying to add a zesty contrast that lifts the rich paneer.
- Spice Level: Adjust chili powder or add cayenne for more heat, or skip for milder bites.
Equipment & Tools
- Non-stick skillet or cast iron pan: Provides even heat for crispy frying
- Spatula: Turns and removes paneer without breaking
- Small bowl: Prepares coating mixture for easy tossing
- Paper towels: Drains excess oil from fried paneer
- Measuring spoon: Ensures consistent coating and seasoning
Step-by-step guide to crispy paneer
- Equipment & Tools: Gather a non-stick skillet or cast iron pan, a spatula, a small bowl for coating, paper towels for draining, and a measuring spoon for even coating.
- Cut the paneer: Slice into 1-inch cubes, about the size of a dice. Keep the pieces uniform for even cooking.
- Prepare coating: Mix cornstarch or rice flour with a pinch of salt and optional spices like turmeric or chili powder in a small bowl.
- Coat the paneer: Gently toss the cubes in the flour mixture, ensuring each piece is lightly coated. Tap off excess to prevent clumping.
- Heat oil: Pour enough neutral oil to cover the bottom of your pan, about 1-2 mm deep. Heat on medium-high until shimmering (~180°C/356°F).
- Fry the cubes: Carefully place the coated paneer in the hot oil, avoiding overcrowding. Fry in batches if needed.
- Cook until golden: Shake the pan gently and fry for 2-3 minutes. The cubes should turn crispy and golden brown. If they stick, lift with a spatula and adjust heat.
- Check doneness: The outside should be crackly and fragrant. The interior remains soft and milky. If not, fry a bit longer, but avoid burning.
- Drain and rest: Transfer to paper towels to drain excess oil. Let sit for 1-2 minutes to firm up before serving.
- Finishing touches: Optionally, toss with a squeeze of lemon or fresh herbs for brightness. Serve hot with your favorite dip or salad.
Let the fried paneer rest briefly on paper towels, then serve immediately for maximum crunch. Toss with lemon or herbs if desired, and plate in a warm dish to keep crispy.
How to Know It’s Done
- Color: Cubes should be evenly golden and crackly.
- Texture: Outside crispy, inside soft and milky when bitten.
- Appearance: Uniform size and coating without clumping or burnt spots.
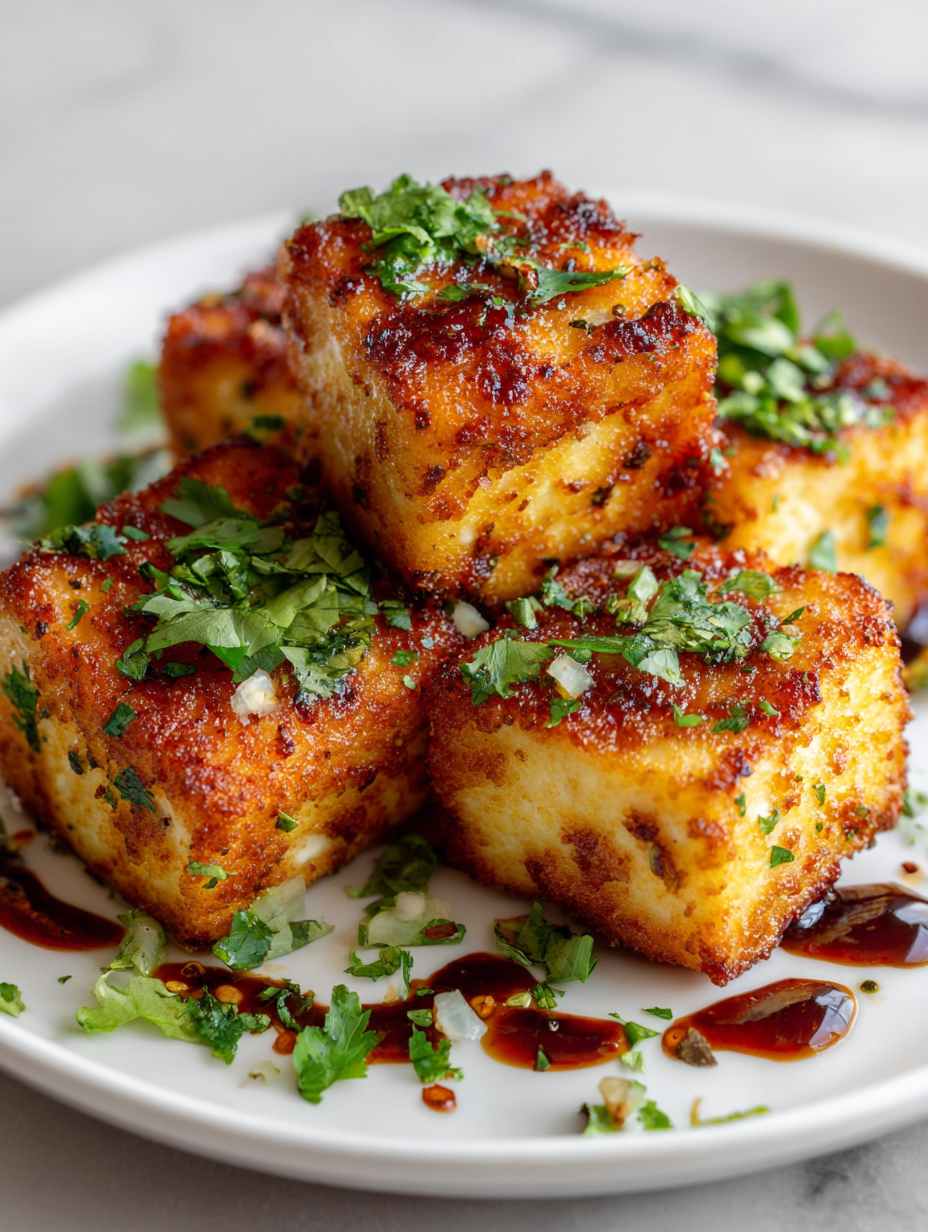
Crispy Fried Paneer Cubes
Ingredients
Equipment
Method
- Gather your tools: a non-stick skillet, a spatula, a small bowl, paper towels, and a measuring spoon.
- Slice the paneer into uniform 1-inch cubes, keeping the pieces roughly the same size for even cooking.
- In the small bowl, combine cornstarch or rice flour with salt, turmeric, and chili powder, then mix well to create a seasoned coating.
- Gently toss the paneer cubes in the flour mixture, ensuring each piece is lightly coated. Tap off excess flour to prevent clumping.
- Heat the oil in your skillet over medium-high heat until shimmering and hot, about 180°C (356°F). You can test the temperature by adding a tiny drop of water—if it sizzles immediately, you’re ready.
- Carefully add the coated paneer cubes into the hot oil, making sure not to overcrowd the pan. Fry in batches if necessary to keep the temperature steady.
- Fry the cubes for about 2-3 minutes, gently shaking the pan or flipping with a spatula until they turn a beautiful golden brown and crackle as they fry.
- Using a slotted spatula, lift the crispy paneer out of the oil and transfer to a paper towel-lined plate to drain excess oil.
- Repeat the frying process with remaining cubes, maintaining the oil temperature and avoiding crowding the pan.
- Allow the fried paneer to rest for a minute to firm up the exterior, then serve immediately while hot and crispy. Optionally, squeeze fresh lemon for a zesty finish.
Notes
Tips for perfect crispy paneer
- Use a hot pan—wait until the oil shimmers before adding paneer.
- Coat lightly—avoid clumping by tapping off excess flour.
- Fry in batches—crowding cools the oil and softens the crust.
- Flip gently—let the cubes develop a golden crust before turning.
- Check oil temperature—use a thermometer to keep it around 180°C/356°F.
- Rest briefly—drain on paper towels for maximum crispness.
- Serve immediately—crispy paneer is best enjoyed hot and fresh.
Common mistakes and how to fix them
- FORGOT to preheat oil → Oil was cold, resulting in soggy cubes. Preheat to shimmering before frying.
- DUMPED too many cubes at once → Overcrowding causes steaming, not frying. Fry in small batches for crispness.
- OVER-TORCHED the paneer → Burnt outside, raw inside. Keep heat moderate, and watch for golden color.
- CUT paneer unevenly → Inconsistent cooking. Aim for uniform cubes, about 1-inch for even crispiness.
Quick fixes and pantry swaps
- When oil shimmers, splash a tiny drop of water to test heat—rescue with a quick stir.
- If sticking occurs, patch with a gentle nudge of a spatula and adjust heat slightly lower.
- Splash a little more oil if cubes turn dry or unevenly crispy during frying.
- Shield burnt paneer by removing from heat immediately and starting anew with fresh oil.
- When in doubt, swap cornstarch for rice flour for a lighter, crunchier coat and crispier texture.
Prep, store, and reheat tips
- Prep the paneer cubes in advance by cutting and coating them; keep refrigerated for up to 2 hours to maintain freshness and prevent sticking.
- Store fried paneer in an airtight container in the fridge for up to 24 hours. The texture remains crispy, but reheating is necessary for best results.
- Reheat in a hot oven (around 190°C/375°F) or a skillet to restore crunch—expect some loss of crispness but an acceptable texture with proper reheating.
- Avoid freezing fried paneer, as it can become soggy upon thawing. Fresh is best if you want that crackly exterior and soft interior.
- When reheating, look for a warm, fragrant smell and a slight shimmer on the surface; the exterior should regain some crispness without burning.
Top questions about paneer cubes
1. Can I use soft paneer for frying?
Use firm or extra-firm paneer; softer types tend to break apart when frying.
2. Should I soak the paneer before frying?
Yes, soaking in warm water for 10 minutes can soften the paneer and improve texture.
3. What oil works best for frying paneer?
Use high smoke point oils like vegetable or canola for crispy results without burning.
4. How many paneer cubes should I fry at once?
Fry in small batches to prevent sticking and ensure even crispiness.
5. How do I know when the paneer is crispy enough?
Look for a golden, crackly exterior and a soft, milky interior as signs of doneness.
6. How thick should the coating be?
Coat lightly with cornstarch or rice flour; too much can make it greasy and heavy.
7. How do I reheat fried paneer?
Reheat in a hot oven or skillet to restore crunch; avoid microwaving as it softens the crust.
8. Can I add flavors after frying?
Add a squeeze of lemon or fresh herbs after frying for extra brightness and flavor.
9. How long can I keep fried paneer fresh?
Store fried paneer in an airtight container in the fridge for up to 24 hours.
10. What if my paneer turns out soggy?
If the oil is too cold, the paneer will turn soggy. Keep it hot and shimmering before frying.
Frying paneer cubes might seem simple, but the magic happens in those tiny details—like the right oil temperature and gentle handling. Each batch is a little experiment, and over time, you learn exactly when they’re crispy enough, and when to pull them out. It’s a quick snack that’s honestly worth the patience.
This dish is perfect for when you want something satisfying without much fuss, especially during busy weeknights or when friends drop by unexpectedly. The smell of frying paneer, the crackle of that golden crust, it all reminds me how a simple ingredient can turn into something memorable. No matter how many times I make it, I still get a little thrill when I see those perfect cubes.

Hi, I’m Emma Collins, the recipe developer and writer behind Sailing With Seasons. I’m so happy you’ve found your way here. This blog is my celebration of seasonal ingredients, simple cooking, and the quiet joy that comes from preparing food with intention. Sailing With Seasons is where I share the recipes, lessons, and kitchen rituals that have shaped my life. It is a space built on curiosity, care, and a deep respect for real ingredients.


Leave a Reply