This yogurt snack jar is my go-to when I need a quick comfort, something portable that feels like a hug in a jar. It’s funny how layering simple ingredients can turn into a little moment of joy, especially when you’re on the move or craving a taste of home. I’ve made these for mornings, lazy afternoons, or even as a weekend treat that feels just a bit special.
What I love most is how adaptable it is—swap in your favorite fruits, nuts, or a drizzle of honey, and suddenly it’s your own little creation. It’s honest, not fancy, just real food that’s easy to throw together and keeps well in the fridge. It’s like a tiny portable comfort that you can carry around, no fuss, no mess, just wholesome layers waiting to be enjoyed.
Focusing on how this yogurt snack jar doubles as a portable comfort, blending nostalgia and practicality in every layer.
The story behind this recipe
- This recipe actually came from a lazy Sunday when I was trying to clear out the fridge and wanted something quick, portable, and satisfying. I remembered how my grandma used to layer yogurt with fruits in small jars, making me feel cozy even on busy mornings. That simple idea stuck with me, and I’ve been tweaking it ever since, trying to keep it honest and real.
- One weekend, I threw in some leftover granola and a dash of honey just for kicks. The crunch and sweetness made me realize how these jars can be both a snack and a little bit of comfort. It’s not fancy, but it’s honest—the kind of thing you keep coming back to when you want something familiar and easy.
- heading: The story behind this recipe
Key Ingredients Breakdown
- Greek yogurt: I lean toward thick, creamy Greek yogurt for that rich, velvety texture that feels indulgent but is still healthy. Swap with regular yogurt if you prefer lighter, but your jar won’t be as luscious.
- Honey: I love a generous drizzle of honey for natural sweetness and that sticky, floral aroma that wakes up the palate. If you’re avoiding sugar, a splash of maple syrup works, but it’ll lose some of that floral brightness.
- Fresh berries: Bright, juicy berries are my top pick—they burst with flavor and add a splash of color. Frozen berries work fine if fresh aren’t available, just let them thaw a bit first to avoid a watery mess.
- Granola: Crunchy granola adds that satisfying texture contrast. I prefer a nutty, honeyed variety, but swap in toasted oats or even crushed nuts if you want something lighter or more savory.
- Chia seeds: Tiny but mighty, chia seeds add a subtle crunch and a boost of fiber. Soak them in a little water beforehand if you want them to be softer, or sprinkle directly for a slight crunch.
- Citrus zest: A little lemon or orange zest can brighten everything up—think zesty, aromatic bursts that cut through the richness. Skip if citrus isn’t your thing, but you’ll miss that zing.
- Nuts: Chopped almonds or walnuts for extra crunch and richness. Toast them lightly first for a deeper, nuttier aroma, but raw nuts work too if you’re in a rush.
Spotlight on key ingredients
Greek yogurt:
- I lean toward thick, creamy Greek yogurt for that rich, velvety texture that feels indulgent but is still healthy. Swap with regular yogurt if you prefer lighter, but your jar won’t be as luscious.
- Honey: I love a generous drizzle of honey for natural sweetness and that sticky, floral aroma that wakes up the palate. If you’re avoiding sugar, a splash of maple syrup works, but it’ll lose some of that floral brightness.
- Fresh berries: Bright, juicy berries are my top pick—they burst with flavor and add a splash of color. Frozen berries work fine if fresh aren’t available, just let them thaw a bit first to avoid a watery mess.
Granola and Chia seeds:
- Granola: Crunchy granola adds that satisfying texture contrast. I prefer a nutty, honeyed variety, but swap in toasted oats or even crushed nuts if you want something lighter or more savory.
- Chia seeds: Tiny but mighty, chia seeds add a subtle crunch and a boost of fiber. Soak them in a little water beforehand if you want them to be softer, or sprinkle directly for a slight crunch.
Notes for ingredient swaps
- Dairy-Free: Swap Greek yogurt for coconut or almond yogurt. It’ll be creamier but might lack the tang of dairy.
- Sweetener: Use agave syrup or brown rice syrup instead of honey. They bring different floral or caramel notes.
- Fruits: Frozen berries or thawed tropical fruits like mango or pineapple can replace fresh berries for a different burst of flavor.
- Crunchy Topping: Replace granola with toasted coconut flakes or crushed pretzels for a savory crunch.
- Seeds: Sunflower or pumpkin seeds can stand in for chia seeds. They add crunch and are equally nutritious.
- Zest: Lime zest can substitute lemon or orange zest, offering a sharper, more aromatic citrus note.
- Nuts: Cashews or pecans work well if almonds or walnuts aren’t available, each contributing their own richness.
Equipment & Tools
- Small jar or container with lid: For layering and portability.
- Spoon: To scoop and spread ingredients smoothly.
- Knife: For chopping fruits or nuts.
- Measuring spoons: For honey and chia seeds.
Step-by-step guide to yogurt jar
- Gather all your ingredients and tools on the countertop. Use a small jar or container with a lid for layering.
- Prepare the yogurt base: scoop about 1 cup of thick Greek yogurt into the jar. Smooth out with a spoon to create an even layer.
- Add the fruit layer: select your berries or chopped fruit. For berries, sprinkle a generous handful on top of the yogurt. For sliced fruit, layer neatly over the yogurt, pressing lightly.
- Sprinkle the crunchy layer: add a couple of tablespoons of granola or crushed nuts on top of the fruit. This adds texture and a bit of sweetness.
- Drizzle with honey: lightly swirl honey over the top to enhance flavor. For a citrus twist, add a little lemon or orange zest at this stage.
- Finish with chia seeds: sprinkle a teaspoon of soaked or dry chia seeds for added fiber and crunch. Press gently to settle.
- Seal the jar with the lid. Give it a gentle shake or turn it upside down once to evenly distribute the layers, if desired.
- Rest the jar: let it sit in the fridge for at least 10 minutes to meld flavors or enjoy immediately for a fresher taste.
- Serve: unscrew the lid, insert a spoon, and enjoy the layered textures and bright flavors. Perfect for a quick snack or portable breakfast.
Seal the jar tightly, then give it a gentle shake or inversion to mix layers slightly if desired. Serve straight from the fridge with a spoon, or take it on the go for a portable treat.
How to Know It’s Done
- Yogurt layer should be creamy and smooth, with no separation.
- Fruits are vibrant and slightly softened, not mushy.
- Granola or nuts stay crunchy and haven’t soaked through the layers.
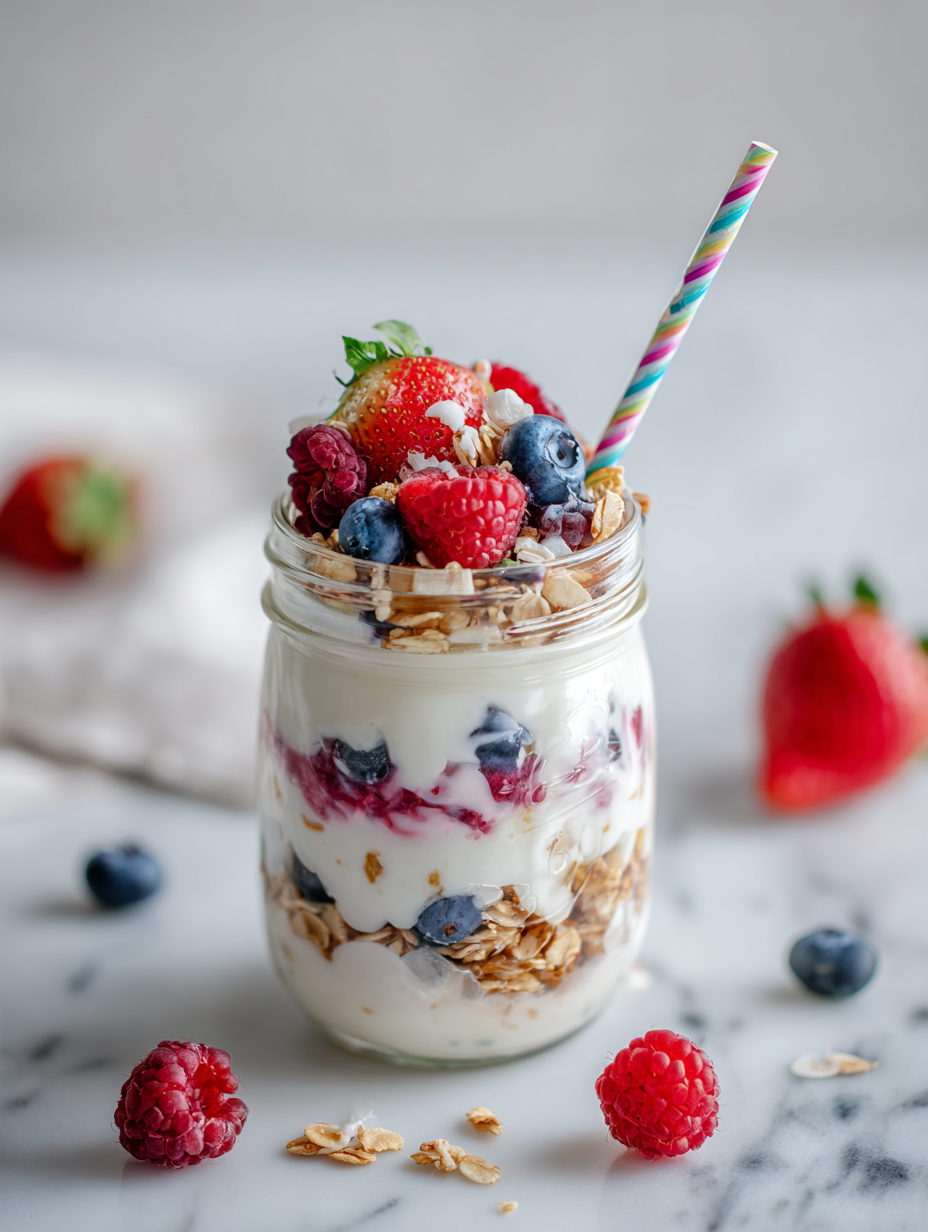
Yogurt Snack Jar
Ingredients
Equipment
Method
- Scoop the Greek yogurt into your small jar, smoothing it out with the back of a spoon so the layer looks even and inviting.
- Top the yogurt with a handful of fresh berries, pressing them slightly into the yogurt to help them settle and release their vibrant juices.
- Sprinkle the crunchy granola over the berries, adding enough to create a satisfying texture contrast and a visual layer of speckled goodness.
- Drizzle honey over the top, letting it cascade down the layers, adding sweetness and a sticky aroma that invites you in.
- Add a teaspoon of citrus zest over the honey for a bright, aromatic burst that elevates the layered flavors.
- Sprinkle the chia seeds over the top, pressing them gently into the surface to help them settle or leave them dry for a slight crunch.
- Seal the jar tightly with the lid, then give it a gentle shake or inversion to slightly mix the layers, ensuring every spoonful has a bit of everything.
- Place the jar in the fridge for at least 10 minutes to allow flavors to meld, or enjoy immediately for a fresh, vibrant treat.
- When ready to serve, unscrew the lid, insert a spoon, and dig into the colorful layers, savoring the creamy, crunchy, and juicy textures in every bite.
Notes
Pro tips for perfect yogurt jars
- Use full-fat Greek yogurt for a rich, creamy base that holds up well and feels indulgent.
- Drizzle honey while layering to prevent sogginess; it keeps the top sticky and aromatic.
- Select berries that are firm and vibrant; crush or slice just before layering for maximum freshness.
- Toast your nuts lightly beforehand to intensify their aroma and crunch, making each bite more satisfying.
- When adding chia seeds, soak them in a little water for softer texture or sprinkle dry for crunch.
- Keep ingredients chilled; cold layers meld better and keep the jar refreshingly cool on the go.
- Finish with a gentle swirl or a light shake after sealing—this helps distribute flavors evenly without mixing completely.
Common Yogurt Snack Jar Mistakes
- FORGOT to balance layers? Add a bit more yogurt or fruit to even out textures.
- DUMPED the jar before it set? Let it chill longer – patience makes the layers perfect.
- OVER-TORCHED the granola? Switch to a lower oven temp or add later for crunch.
- MISSED mixing honey? Drizzle after layering to prevent sogginess and keep flavor bright.
Quick Fixes for Yogurt Jars
- If yogurt is too runny, add a spoonful of thick Greek yogurt to thicken and rescue texture.
- When berries are watery, sprinkle a bit of sugar and let sit 5 minutes to draw out flavor.
- Splash a little lemon juice if the fruit looks dull or lacks brightness.
- Patch soggy granola by adding a fresh handful on top just before serving.
- Shield layers from excess moisture by keeping jars sealed tightly and refrigerated immediately.
Prep, store, and reheat tips
- Prepare the yogurt and fruit layers ahead of time; store separately to keep textures fresh and vibrant.
- Keep assembled jars in the fridge for up to 24 hours; beyond that, the fruit may soften too much, and yogurt may lose its bright tang.
- Refrigerate covered with a lid or plastic wrap; the layers will meld slightly, enhancing flavor but slightly reducing crunch.
- To reheat, enjoy straight from the fridge; if it’s too cold, let it sit at room temperature for 5 minutes until sensory cues—aroma and flavor—warm up.
Top questions about Yogurt Snack Jar
1. Can I use regular yogurt instead of Greek?
Use full-fat Greek yogurt for creaminess, but regular yogurt works if you prefer lighter. The texture will be less rich.
2. Can I use frozen berries for this recipe?
Yes, frozen berries are fine; just thaw them first to avoid excess water and sogginess.
3. How much honey should I add?
Adjust honey quantity based on your sweetness preference. Start with a teaspoon and add more if desired.
4. Can I make this ahead of time?
Yes, you can prepare the layers ahead. Keep the jar in the fridge for up to 24 hours, but add crunchy toppings just before eating.
5. How should I store the yogurt jar?
To keep the layers fresh, store the jar with the lid tightly sealed and avoid overfilling with wet ingredients.
6. What if my yogurt is too watery?
If the yogurt is too runny, mix in a spoonful of extra Greek yogurt to thicken it up before layering.
7. Should I soak the chia seeds beforehand?
When adding chia seeds, soak them in water for softer texture, or sprinkle dry for a slight crunch.
8. Can I substitute nuts used in the jar?
Use crunchy nuts like almonds or walnuts; toast them lightly for extra flavor and aroma.
9. Can I use other zest besides lemon or orange?
For a citrus twist, add lemon or orange zest; it brightens the flavors and adds aromatic zest.
10. How do I keep granola crunchy in the jar?
If the granola gets soggy, top the jar with fresh granola just before eating for maximum crunch.
This little jar of yogurt is more than just a snack; it’s a small act of comfort you can carry around. The layers of tangy yogurt, sweet fruit, and crunchy nuts make every bite a reminder to slow down and enjoy simple pleasures. It’s honest food, perfect for busy days or lazy weekends when you need a quick moment of calm.
In a world that keeps rushing, these jars offer a pause—familiar, satisfying, and just a bit indulgent. They’re a reminder that sometimes, the best things are layered in the simplest ways, waiting patiently in your fridge for you to rediscover.

Hi, I’m Emma Collins, the recipe developer and writer behind Sailing With Seasons. I’m so happy you’ve found your way here. This blog is my celebration of seasonal ingredients, simple cooking, and the quiet joy that comes from preparing food with intention. Sailing With Seasons is where I share the recipes, lessons, and kitchen rituals that have shaped my life. It is a space built on curiosity, care, and a deep respect for real ingredients.


Leave a Reply