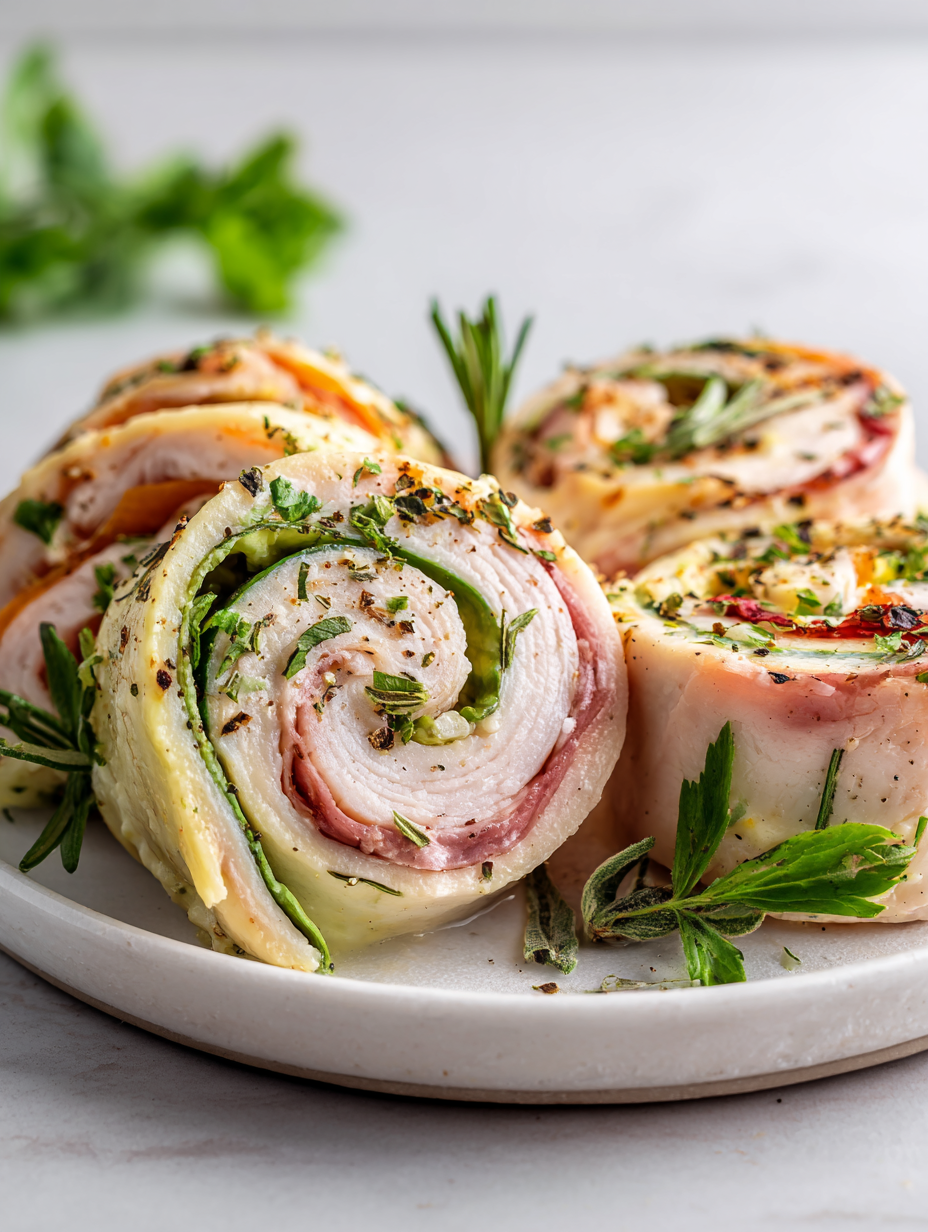
This turkey cheese roll-up idea came together one chaotic afternoon when I was staring at a fridge full of odds and ends. Instead of letting the leftovers go to waste, I started layering slices of turkey with melting cheese, and before I knew it, I had a snack that felt fancy but was dead simple to throw together. It’s the kind of thing I make when I want quick gratification without sacrificing flavor or texture.
What I love about these roll-ups is how adaptable they are. A little crunch from the bread or cracker base, the gooey stretch of melted cheese, and the savory punch of turkey—those flavors just work. Plus, they’re perfect for when I need something easy to hold, whether for a quick lunch, a snack on the go, or a last-minute appetizer that still feels special.
Sometimes, it’s the simplest things—like a handful of cold turkey and some cheese—that turn into a little moment of comfort. These roll-ups remind me that you don’t always need fancy ingredients or complicated techniques to make something satisfying. They’re honest, fast, and a reminder that leftovers can be turned into something pretty memorable.
Focusing on the overlooked art of transforming simple leftovers into elegant, crowd-pleasing appetizers that feel special but are quick to assemble.
The story behind this recipe
- This recipe was born out of a busy weeknight scramble when I needed something quick, warm, and satisfying without turning on the oven. I remembered how my grandma used to roll up slices of turkey with cheese and a smear of mustard—simple, honest, no fuss. That memory stayed with me, and I started playing around with it, adding a little flair from what I had in the fridge.
- What I love is how these roll-ups feel like a tiny victory—something you can whip up in minutes, yet taste like it took effort. They remind me that sometimes, the simplest ingredients—cold turkey, a meltable cheese, a quick sear—create the best comfort foods. No need for fancy sauces or complicated steps, just honest flavors and a bit of kitchen instinct.
- story_type
- paragraph
Key ingredients and tips
- Turkey slices: I prefer using cold, roasted turkey from the deli, which stays firm and slices smoothly. If yours is too thick or wet, pat it dry before rolling to prevent sogginess.
- Cheese: Melty cheeses like Swiss or cheddar work best for a gooey stretch. For a milder flavor, try mozzarella—just watch it melt quickly and become stringy.
- Wrap or bread base: I often use thin sliced bread or sturdy lettuce leaves for a crunch and structure. If you want a gluten-free option, collard greens are a good swap—just ensure they’re tender enough to roll.
- Spread or condiment: A smear of mustard or mayo adds flavor and moisture. If you prefer a tangy punch, mustard seeds or a splash of vinegar can brighten it up.
- Additional fillings: A few thinly sliced pickles or a dash of hot sauce can elevate the flavor. Just keep fillings light—overstuffing makes rolling tricky and messier.
- Seasonings: A pinch of black pepper or smoked paprika can add depth. I often sprinkle a little fresh thyme or parsley—fresh herbs make a noticeable difference.
- Oil or butter: A light brush helps the roll-ups brown nicely if you give them a quick sear. Use a neutral oil or butter; too much can make them greasy, so just a thin coat is enough.
Spotlight on key ingredients
Turkey:
- Turkey slices: I prefer using cold, roasted turkey from the deli, which stays firm and slices smoothly. If yours is too thick or wet, pat it dry before rolling to prevent sogginess.
- Cheese: Melty cheeses like Swiss or cheddar work best for a gooey stretch. For a milder flavor, try mozzarella—just watch it melt quickly and become stringy.
Cheese:
- Melty cheeses like Swiss or cheddar work best for a gooey stretch. For a milder flavor, try mozzarella—just watch it melt quickly and become stringy.
- Wrap or bread base: I often use thin sliced bread or sturdy lettuce leaves for a crunch and structure. If you want a gluten-free option, collard greens are a good swap—just ensure they’re tender enough to roll.
Notes for ingredient swaps
- Dairy-Free: Use almond or soy-based cheese alternatives. They melt differently and can be a bit less gooey, but still flavorful.
- Low-Sodium: Opt for reduced-salt turkey slices and cheese. You might miss a bit of saltiness, so add herbs or spices to boost flavor.
- Gluten-Free: Swap bread with collard greens or large lettuce leaves. They add crunch and freshness, though they won’t toast like bread.
- Vegan: Replace turkey with marinated tofu or tempeh slices, and cheese with vegan cheese. The texture will be softer, but still satisfying.
- Spicy Kick: Add a dash of hot sauce or sliced jalapeños inside for a fiery twist. Watch for overstuffing, which can make rolling tricky.
Equipment & Tools
- Sharp knife: To cut ingredients neatly and slice roll-ups cleanly.
- Skillet or frying pan: To crisp up the roll-ups and melt the cheese evenly.
- Cutting board: To prepare and assemble the ingredients safely.
- Spatula: To flip and handle hot roll-ups safely.
- Measuring spoons: To add precise amounts of condiments or seasonings.
Step-by-step guide to Turkey Cheese Roll Ups
- Gather all your ingredients: sliced turkey, cheese, bread or wraps, and any extras. Keep everything within arm’s reach for efficiency.
- Prepare your workspace: lay out a clean cutting board, a sharp knife, and a plate for rolled-ups. Preheat a skillet to medium (about 175°C/350°F).
- Lay a slice of bread or a lettuce leaf on the cutting board. If using bread, lightly toast it for a bit of crunch, about 2 minutes in a toaster or under a broiler until golden.
- Spread a thin layer of mustard or mayo over the bread or leaf. This helps everything stick and adds a flavor punch.
- Lay slices of turkey evenly across the spread—about 2-3 slices per roll-up, depending on size. Overlap slightly for easy rolling.
- Place cheese slices on top of the turkey—choose a melting cheese like Swiss or cheddar. Use enough for a gooey bite, about 1-2 slices.
- Optional: add a few thin pickle slices or a dash of hot sauce for extra flavor. Keep fillings light to avoid tearing the wrap.
- Gently roll up from one end, pressing lightly to seal. If using bread, press slightly to help it stick; if using lettuce, fold neatly.
- Heat a small amount of oil or butter in the skillet. Once shimmering, place the roll-ups seam side down. Cook for about 2-3 minutes, until golden and crispy.
- Carefully flip and cook the other side for another 2 minutes. Look for a nice brown color and a fragrant aroma of toasted bread and melted cheese.
- Check for doneness: the cheese should be oozy, the bread golden, and the outside crisp. If cheese isn’t melting, cover skillet briefly.
- Remove from skillet and let rest for 1-2 minutes. This helps the cheese set slightly and makes handling easier.
- Slice the roll-ups in half diagonally for presentation. Serve warm for maximum gooeyness, or at room temperature if needed.
Let the roll-ups rest for a minute to settle the cheese. Slice diagonally, plate on a warm dish, and serve immediately for best gooey texture.
How to Know It’s Done
- Cheese is melted and gooey when sliced open.
- Bread or wrap is golden brown and crispy on edges.
- Internal temperature reaches about 60°C/140°F for food safety.
Turkey Cheese Roll-Ups
Ingredients
Equipment
Method
- Lay out all your ingredients within easy reach: turkey slices, cheese, toasted bread, and condiments.
- Spread a thin layer of mustard or mayo over each toasted bread slice to add flavor and help fillings stick.
- Place 2-3 slices of turkey evenly over the condiment-covered bread or lettuce leaf, overlapping slightly to make rolling easier.
- Lay a slice of melting cheese on top of the turkey, ensuring it covers most of the filling for gooeyness.
- Optional: add a few thin pickle slices or a dash of hot sauce for extra flavor inside the roll-up.
- Carefully roll up from one end, pressing gently to seal the edges, creating a compact, filled cylinder.
- Heat a tablespoon of oil or butter in a skillet over medium heat until shimmering and fragrant.
- Place the rolled-up roll-ups seam side down into the hot skillet, cooking for about 2-3 minutes until golden brown and crispy.
- Gently flip the roll-ups and cook the other side for another 2 minutes, until evenly browned and the cheese is melted inside.
- Remove the roll-ups from the skillet and let them rest for 1-2 minutes to allow the cheese to set slightly.
- Slice the roll-ups in half diagonally for a beautiful presentation, and serve warm for maximum gooeyness or at room temperature.
Notes
Tips for perfect roll-ups
- Bolded Mini-Head: Use a sharp knife to slice turkey thinly—less than ¼ inch for easy rolling and even layers.
- Bolded Mini-Head: Toast bread lightly—just enough to add crunch without drying out the roll-up or making it tough to roll.
- Bolded Mini-Head: When searing, keep the heat at medium—around 175°C/350°F—to get a golden crust without burning.
- Bolded Mini-Head: Let the roll-ups rest for a minute after cooking—this lets the cheese set and keeps fillings in place.
- Bolded Mini-Head: For a crisp outside, brush roll-ups lightly with oil or melted butter before frying—adds flavor and color.
- Bolded Mini-Head: If cheese isn’t melting evenly, cover the skillet briefly—traps heat and helps gooeyness develop.
- Bolded Mini-Head: Use tongs or a spatula to handle hot roll-ups—avoids squishing or tearing, keeps presentation tidy.
Common mistakes and how to fix them
- FORGOT to dry the turkey slices → Make sure to pat dry to prevent sogginess.
- DUMPED cheese directly from fridge → Let cheese come to room temp for better melting.
- OVER-TORCHED bread → Keep an eye on toasting; golden edges are perfect, black is bitter.
- MISSED resting time → Rest roll-ups for 1-2 minutes; helps cheese set and prevents mess.
Quick fixes and pantry swaps
- When the cheese isn’t melting, cover the skillet for 30 seconds to trap heat.
- If roll-ups fall apart, chill them for 10 minutes to firm up the cheese and fillings.
- Splash a little water in the pan if bread starts to burn—reduce heat immediately.
- Patch soggy turkey by patting it dry before rolling to prevent moisture overload.
- Shield over-toasted bread with a damp cloth—quick fix for a burnt edge or bitter flavor.
Prep, store, and reheat tips
- You can prep the turkey slices and cheese ahead—store them separately in airtight containers in the fridge for up to 2 days. The flavors stay fresh, but the turkey might lose a bit of its firmness.
- Assemble the roll-ups just before serving to keep the bread or lettuce crisp. If making in advance, wrap them tightly in plastic wrap and refrigerate for up to 12 hours. The cheese may firm up slightly, so give them a quick warm-up if you want gooeyness again.
- Reheating is simple: place the roll-ups in a preheated skillet over medium-low, about 150°C/300°F, for 2-3 minutes, just until the cheese melts again. Be gentle—overheating can make the bread soggy or the fillings dry out.
- Shelf life in the fridge is about 24 hours for best texture and flavor. After that, the bread may become limp, and the turkey could dry out or develop a slight fridge taste. Best enjoyed fresh or reheated gently.
Top questions about Turkey Cheese Roll Ups
1. Can I use cooked turkey instead of deli slices?
Use cold, sliced deli turkey for the best firmness and ease of rolling. Warmed or thick slices can be tricky to work with.
2. What cheese works best for melting?
Cheddar, Swiss, or mozzarella melt well and give that gooey texture. If you want a milder flavor, mozzarella is a good choice.
3. Can I make these gluten-free?
Lettuce leaves or collard greens are good gluten-free options. They add crunch but won’t toast like bread, so handle carefully.
4. Are there vegan alternatives that work well?
Vegan cheese and marinated tofu or tempeh can replace turkey. They soften differently, so expect a softer bite.
5. How can I make these spicy?
Add a dash of hot sauce or sliced jalapeños inside for a spicy kick. Be careful not to overstuff to keep rolling easy.
6. Should I toast the bread first?
Toast bread lightly for crunch, about 2 minutes. Keep an eye so they don’t burn and become bitter.
7. What temperature should I cook these at?
Cook in a medium skillet at around 175°C/350°F until golden and crispy, about 2-3 minutes per side.
8. How long should I rest the roll-ups after cooking?
Let the roll-ups rest for 1-2 minutes after cooking to set the cheese and prevent gooey messes.
9. How do I reheat leftovers?
Reheat gently in a skillet over medium-low heat for 2-3 minutes until cheese melts again. Don’t overheat to avoid sogginess.
10. What if the cheese doesn’t melt?
If cheese isn’t melting, cover the pan briefly for a quick steam that helps gooiness develop.
These roll-ups are more than just a quick snack; they’re a reminder that simple ingredients can create something satisfying and a little special. When I make them, I think about how a few slices of turkey and cheese can turn into a warm, cheesy bite of comfort, even on the busiest days.
In times like these, where everything feels fast and fleeting, having a go-to that’s easy, flexible, and full of flavor is a small but meaningful win. Maybe they’ll become your little secret weapon for last-minute gatherings or a cozy, no-fuss dinner.

Hi, I’m Emma Collins, the recipe developer and writer behind Sailing With Seasons. I’m so happy you’ve found your way here. This blog is my celebration of seasonal ingredients, simple cooking, and the quiet joy that comes from preparing food with intention. Sailing With Seasons is where I share the recipes, lessons, and kitchen rituals that have shaped my life. It is a space built on curiosity, care, and a deep respect for real ingredients.


Leave a Reply